
How to obtain live data
Connect to a live data stream safely and turn its messages into named variable values.
This article explains in detail how to obtain live data in your own application and how to interpret the messages received. In each section, you will find explanations as well as ready-made code tutorials.
Obtaining live data consists of two main steps:
- Connecting to a live data stream: a small server requests a JWT token and the variable list, and a client (e.g., a browser) page opens the WebSocket.
- Interpreting a live data stream: the client's page matches the values in each message to their variables and shows them.
What you will need
- An Application ID, an access token and a company ID. If you do not know yet how to get them, check IXON API Authentication and How to get a company ID.
- A data source with variables configured on your device, so it has something to send.
Connecting to a live data stream
Opening the WebSocket and showing the values happens on the client side, but the requests that need your access token don't. They run on your own server.
How the connection is set up
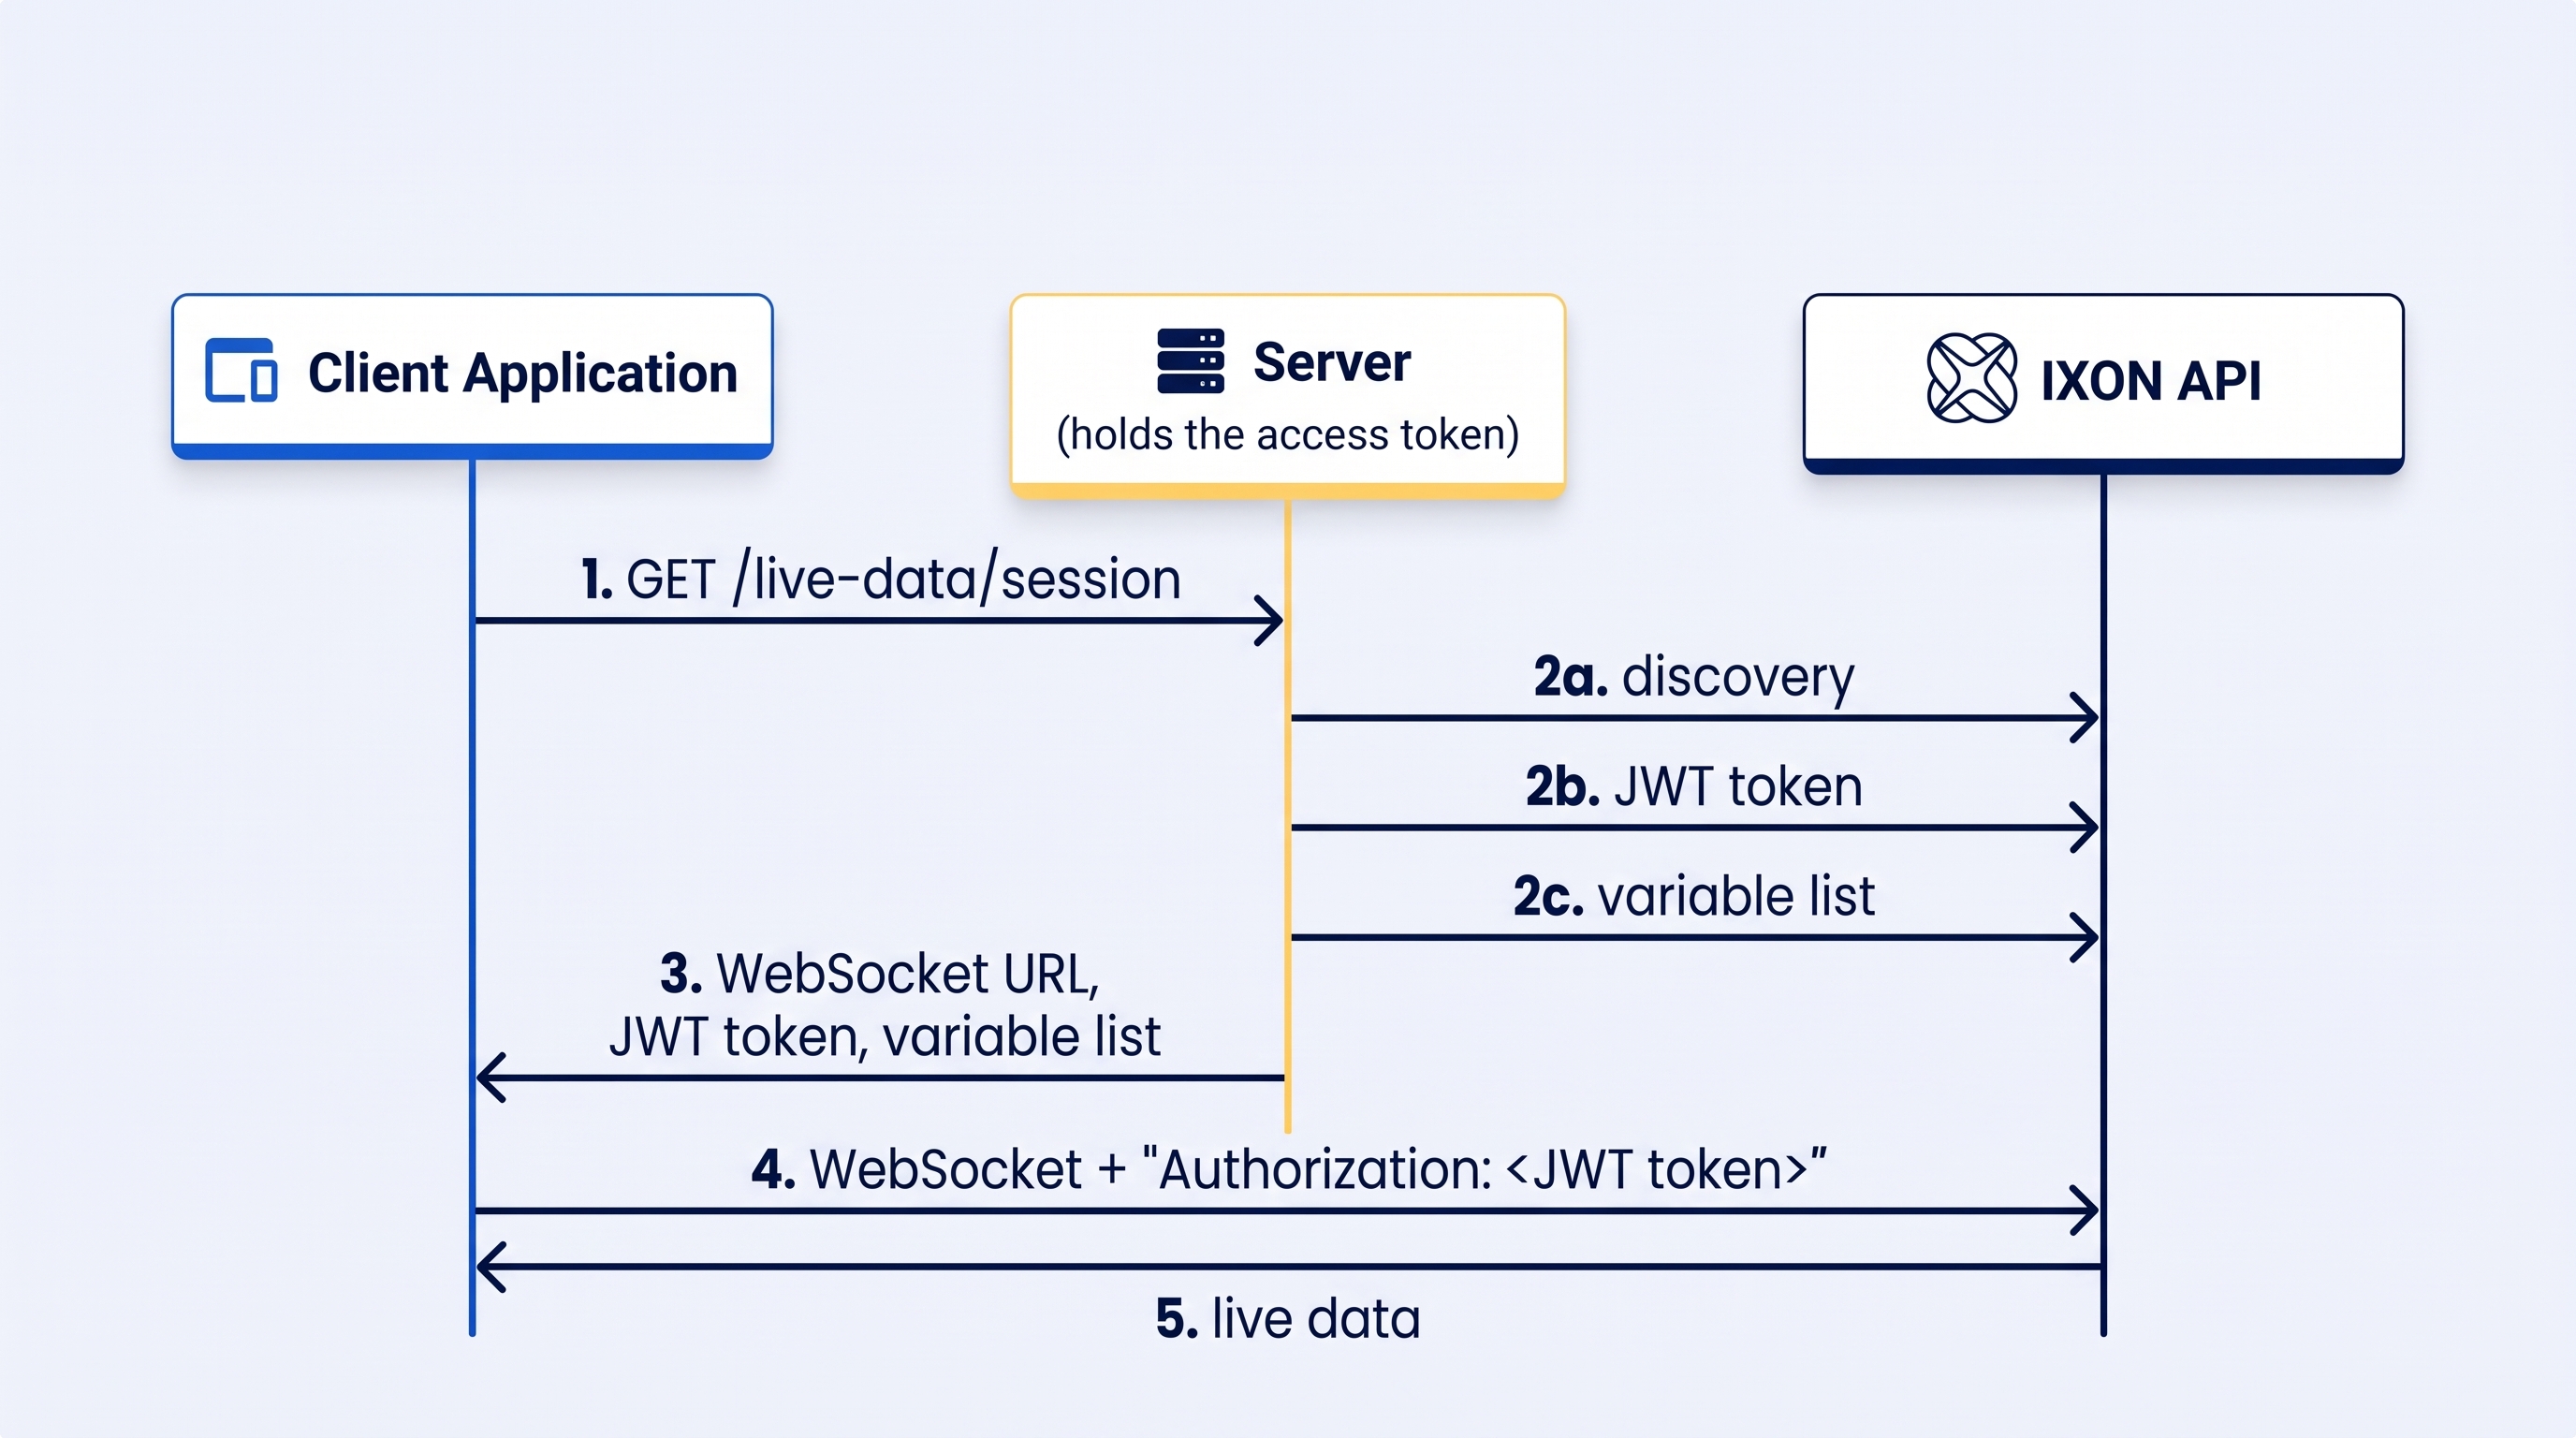
- GET /live-data/session: the client application asks your server for a live data session.
Note: this is an endpoint on your own server, and the name is just an example. - Your server calls the IXON API with its access token:
- Discovery: gets the current URLs of the endpoints, including the WebSocket URL.
- JWT token: requests a short-lived token for the agents the client may stream, with AuthTokenDataList.
- Variable list: gets the names, types and factors of the variables with AgentDataVariableList, needed to interpret the messages.
- WebSocket URL, JWT token, variable list: your server sends these to the client. The access token never leaves the server.
- WebSocket +
Authorization: - Live data: IXON pushes a message with the latest values about every half second, until the connection closes or the token expires.
Never put your access token in a browser page!Anyone who opens the page can read it and use it to call the IXON API as you. Request the JWT token on your server and only send that to the client (browser): it expires after at most an hour and only works for the agents you requested it for.
Deciding which agents a user can stream
The IXON API only gives access to the agents allowed by the roles of the account that makes the request.
The server code tutorial below uses this: it streams exactly the agents that AgentList returns for its access token, so no agent IDs are hard-coded.
How you get that access token depends on your use case, for example a Service Account or a user access token. See IXON API Authentication for the options.
Set up the right permissions for your access tokenThe server code tutorial streams every agent its access token can see. For example, a new Service Account gets the Platform Administrator role, which gives access to all agents in the company. Narrow its roles down to the groups or devices it actually needs before you use it for live data.
The JWT token
The WebSocket doesn't accept your regular access token. Your server requests a JWT token for the agents you want to stream with the AuthTokenDataList endpoint.
- Set
expiresInbetween60(1 minute) and3600(1 hour) seconds. - The token is the
secretIdin the response. UseexpiresOnto know when you need a new one: before it expires, request a fresh token and open a new connection.
curl --request POST \
     --url 'USER.URL:443/api/auth-tokens/data' \
     --header 'Api-Version: 2' \
     --header "Api-Application: <application_id>" \
     --header "Api-Company: <company_id>" \
     --header 'Content-Type: application/json' \
     --header "Authorization: Bearer <access_token>" \
     --data '{
         "expiresIn": 3600,
         "agents": [
             {"publicId": "<agent_id_1>"},
             {"publicId": "<agent_id_2>"}
         ]
     }'
{
"status": "success",
"type": "AuthTokenCreateResponse",
"data": {
"publicId": "<token_id>",
"secretId": "eyJhbGciOiJIUzI1NiIsInR5cCI6IkpXVCJ9.eyJleHAiOjE3OTE4MDAwMDB9.ZXhhbXBsZS1zaWduYXR1cmUtbm90LWEtcmVhbC10b2tlbg",
"expiresOn": "2026-10-06T10:00:00Z"
}
}The WebSocket URL
You find the URL in the AgentDataRealTimeWebSocket entry of the API discovery (USER.URL:443/api/). It looks like this:
wss://<host>/agents/{publicIdList}/data-realtimeReplace {publicIdList} with the agent IDs you want to stream, each followed by a comma. The trailing comma is required, also for a single agent. Without it the server returns a 404.
For example, the final URL for two agents looks like this:
wss://wse.nl-ams.core.dkc.ayayot.com/agents/aBcD1234EfGh,iJkL5678MnOp,/data-realtime
Don't hardcode the WebSocket URLThe URL can change in the future. Read it from the discovery endpoint each time your application starts instead of copying it into your code.
Authenticating the connection
As soon as the connection opens, send the JWT token as the first message, preceded by Authorization: . If the server doesn't receive the token right after the connection opens, it closes the connection.
Here is an example of what the token can look like:
Authorization: eyJhbGciOiJIUzI1NiIsInR5cCI6IkpXVCJ9.eyJleHAiOjE3OTE4MDAwMDB9.ZXhhbXBsZS1zaWduYXR1cmUtbm90LWEtcmVhbC10b2tlbg
Include every agent in the JWT tokenEvery agent in the WebSocket URL must also be included in the JWT token. If one of them isn't, the server replies with {"error": "Authorization failed"} and closes the connection, also for the agents that are in the token.
Code tutorial: how to create the server
This tutorial sets up the server side logic: the discovery, the variable list, the JWT token and the session endpoint the client calls.
Interpreting a live data stream
To keep the stream as fast as possible, live data messages contain only the bare values: no variable names, and values grouped by data type.
Every variable on a data source has a variableId. It identifies the variable's value along the whole real-time pipeline, from the IXagent to your application, and it's the key you'll use to decode each message.
The message format
The example below comes from a data source with six variables. The rest of this section uses the same data source to explain how to interpret it.
{
  "message": {
    "points": [
      {
        "tags": [1, 2, 3, 4, 5, 6],
        "bool": [true],
        "int16": [8738, 5],
        "int32": [9074],
        "str": ["", "Recipe A"],
        "time": 1791280800000
      }
    ],
    "sentTime": 1791280800090
  },
  "agent": { "publicId": "<agent_id>" },
  "device": { "publicId": "<source_id>" }
}| Field | Meaning |
|---|---|
points | One or more sets of values. Each point is a snapshot at one moment. |
tags | The variableId of every variable included in this point. Despite the name, these are not the tagIds used in historical data. |
bool, int16, int32, str, ... | The values, grouped by data type. |
time | When the values were read, in milliseconds since the Unix epoch. |
sentTime | When the message was sent, in milliseconds since the Unix epoch. |
agent.publicId | The agent the values come from. |
device.publicId | The data source the values come from. |
The variable list
To know which value belongs to which variable, request the AgentDataVariableList endpoint with at least the fields variableId, name, type, signed, width, factor, source and internalUse. In the setup above, your server does this and passes the list on to the browser.
curl --request GET \
     --url 'USER.URL:443/api/agents/<agent_id>/data-variables?fields=variableId,name,type,signed,width,factor,source,internalUse&page-size=4000' \
     --header 'Api-Version: 2' \
     --header "Api-Application: <application_id>" \
     --header "Api-Company: <company_id>" \
     --header 'Content-Type: application/json' \
     --header "Authorization: Bearer <bearer_token>"
{
"type": "AgentDataVariable",
"data": [
{
"publicId": "<public_id_1>",
"variableId": 1,
"name": "CloudLogger Error Message",
"type": "str",
"signed": null,
"width": null,
"factor": null,
"source": { "publicId": "<source_id>" },
"internalUse": true
},
{...},
{
"publicId": "<public_id_3>",
"variableId": 3,
"name": "Temperature",
"type": "int",
"signed": true,
"width": "16",
"factor": "0.01000000",
"source": { "publicId": "<source_id>" },
"internalUse": false
},
{...}
],
"moreAfter": null,
"status": "success"
}
Always retrieve the full variable listWithout
page-size, the endpoint returns only the first 20 variables. Interpreting with an incomplete list doesn't fail visibly: every value after the first missing variable gets matched to the wrong name. Check thatmoreAfterisnull. If it isn't, request the next page withpage-after=<moreAfter>until it is.
Some things to know about the list:
variableIds start at 1 for every data source.- Variables with
internalUse: true, such as CloudLogger Error Message (variableId1), are used internally. Leave them out of what you display, but keep them in your list: their values still take up a position in the message, and skipping them would misalign the interpretation. - Values arrive raw, exactly as the device reads them from the machine. If a variable has a
factor, multiply the value by it to get the number the IXON Cloud shows. For example, a raw8738with factor0.01is87.38. - The variable list only changes when the device's configuration changes, so you can fetch it once and cache it.
Data type keys
Each variable's type, signed and width together tell you which array in the message holds its value.
The array name is the type plus the width, with a u in front for unsigned integers. Types without a width, like bool and str, use their type name.
Note that width and factor are returned as a string ("16" and "0.0100000" respectively), and that integers can also be 8-bit (int8 and uint8).
type | signed | width | Array in the message |
|---|---|---|---|
int | true | 16 | int16 |
int | false | 16 | uint16 |
int | true | 32 | int32 |
int | false | 32 | uint32 |
float | null | 32 | float32 |
bool | null | null | bool |
str | null | null | str |
Matching values to variables
Within each data type array, values are ordered by ascending variableId. The first value in int16 belongs to the int16 variable with the lowest variableId, the second to the next one, and so on.
So, for each point:
- Go through the
variableIds intagsfrom lowest to highest. - Look up the variable's data type key.
- Take the next unused value from that data type's array.
If you hit a variableId that isn't in your list, the list is incomplete or out of date. Stop interpreting that point rather than guessing, because every value after it would be assigned to the wrong variable.
Example
The internal variable still takes the first str value. If you skip it in the list, Current Recipe (the next str) would get the empty string instead.
Going through tags of the message format example from lowest to highest gives:
variableId | Name | Data type key | Value in the message | Result |
|---|---|---|---|---|
| 1 | CloudLogger Error Message | str | "" (1st str value) | Hidden: internalUse is true |
| 2 | Machine Running | bool | true (1st bool value) | true |
| 3 | Temperature | int16 | 8738 (1st int16 value) | 87.38 after the factor 0.01 |
| 4 | Production Counter | int32 | 9074 (1st int32 value) | 9074 |
| 5 | Production Speed | int16 | 5 (2nd int16 value) | 5 |
| 6 | Current Recipe | str | "Recipe A" (2nd str value) | "Recipe A" |
When using two or more data sources
Because variableIds start at 1 for every data source, two data sources on the same device can both have, for example, a variable 6. To tell them apart:
- Include the field
sourcein your AgentDataVariableList request. Each variable then comes with thepublicIdof the data source it belongs to. - Use
device.publicIdin each live data message to know which data source the message comes from, and only interpret it against that data source's variables.
Code tutorial: the browser page
This code tutorial is the client side: it opens the WebSocket, interprets every message as described above and shows the values in a live table. It uses the server from the previous code tutorial.
Troubleshooting
| Error | Possible Cause |
|---|---|
404 when opening the WebSocket | Missing trailing comma in {publicIdList}. |
| Connection opens, then closes immediately | The JWT token wasn't sent on open, has expired, or doesn't include this agent. |
| Connected, but no messages arrive | The device is offline or has no variables configured on its data source. |
| Values appear under the wrong names | The variable list is incomplete. Check the pagination. |
| Values differ from the portal by a factor of 10, 100, ... | The variable's factor isn't applied. |
Updated about 2 hours ago