Manage groups, users, roles and more
In this article you will find complete information about the management of groups and their hierarchy, users, invites, roles and access categories.
Introduction to User Management and related endpoints
The management of users can be integrated in custom applications by using the API. You will be able to do perform actions such as integrating an IXON Cloud user invite in your own online environment, or fetching/adding a list of users, removing a user, but also fetching/manipulating roles, groups, access categories and types. After you have obtained the basic information headers (ApplicationId, Bearer Token and CompanyId) you will be able to use the following endpoints to perform such actions.
The purpose of this article is to illustrate a technical overview of the mechanisms of IXON's user management system and its relative API endpoints. For more information and for a fresh set up and more information about roles, groups, permissions and more, it is highly recommended to check out this support article as well as the whole User management section for a deep dive into this topic from a user-friendly perspective.
Field selectionUsing
?fields=*will not always work to select every field belonging to a JSON response, as some elements are mapped as objects (e.g.parentin GroupList). For this reason, in many cURL commands you will notice fields written in a different syntax.Let's take GroupList (GET) as an example: in this case, you will write
agent.publicIdto select just the agent's public ID, orparent.*to select all the fields of the parent object.
Before you start: how to visualize groups
Required moduleTo visualize the Hierarchical user groups in your company, you will need the Subgroups module. Check your modules at Admin > Licenses. To obtain this module, contact your IXON account manager or IXON distributor.
Hierarchical tree
Provided that you have already obtained the required module as mentioned in the note above, you will then be able to create both groups and subgroups represented as a hierarchical tree. This can be useful in case you need to divide different sectors or teams into subgroups and to better structure roles and permissions.
We will use the Packaging Factories and Propack Engineering groups as examples throughout this article:
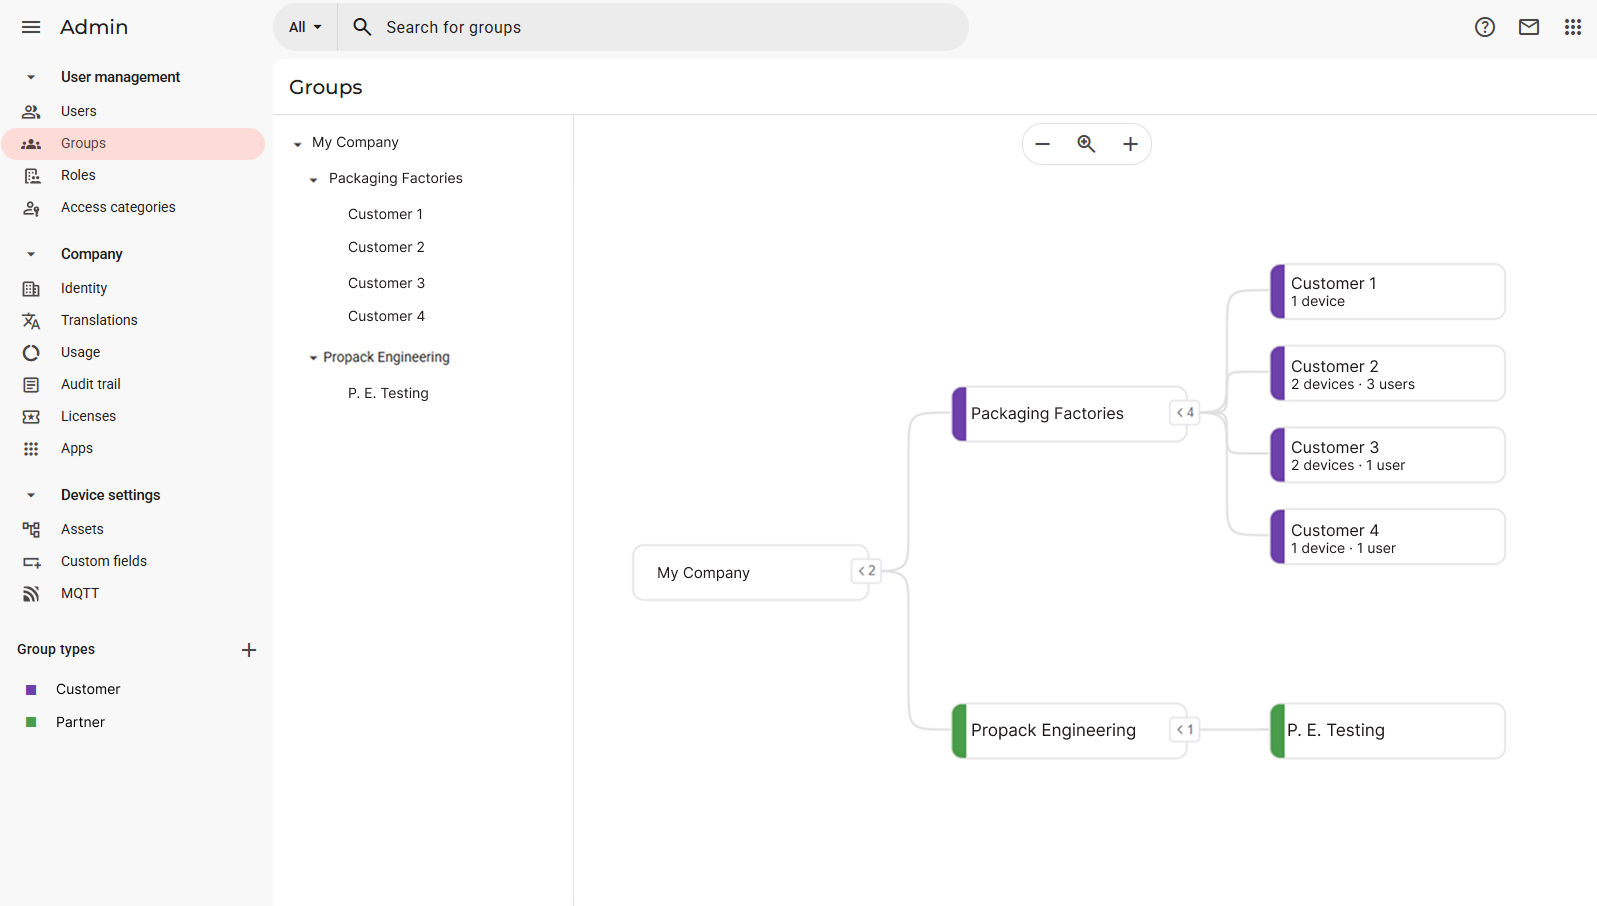
In this type of visualization there are a few differences that we can point out:
-
Each group will display how many devices are assigned to it and how many users are related to it. The latter is set up by assigning roles to users.
-
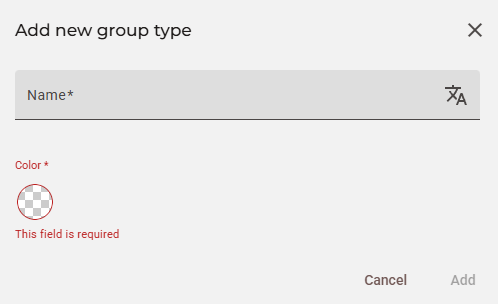
Each group type will have its own color, which is required and which you can customize. You can do so in this interface by clicking on the "+" near Group Types:
-
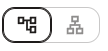
Unlike in the standard group interface, which represents the groups as a list with no subgroups available, you will now see the groups represented in the form of a hierarchical tree, which can be either made vertical or horizontal by clicking on the icons on the top right:
-
The hierarchy of the group types, groups and subgroups is also visible in the form of a hierarchical list positioned to the left of the tree, and which can be interacted with to create new subgroups and to rename or delete existing ones with the "Edit" or "Remove" buttons respectively:
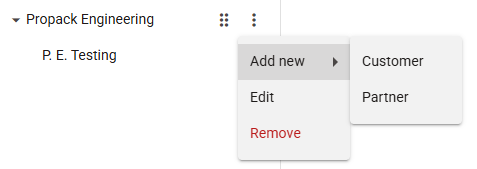
Subgroups of a subgroupNeedless to say, each Customer can have their own subgroups, which can also be of a different type.
Standard group view
Without the Subgroups module, you will see the default view of your groups:
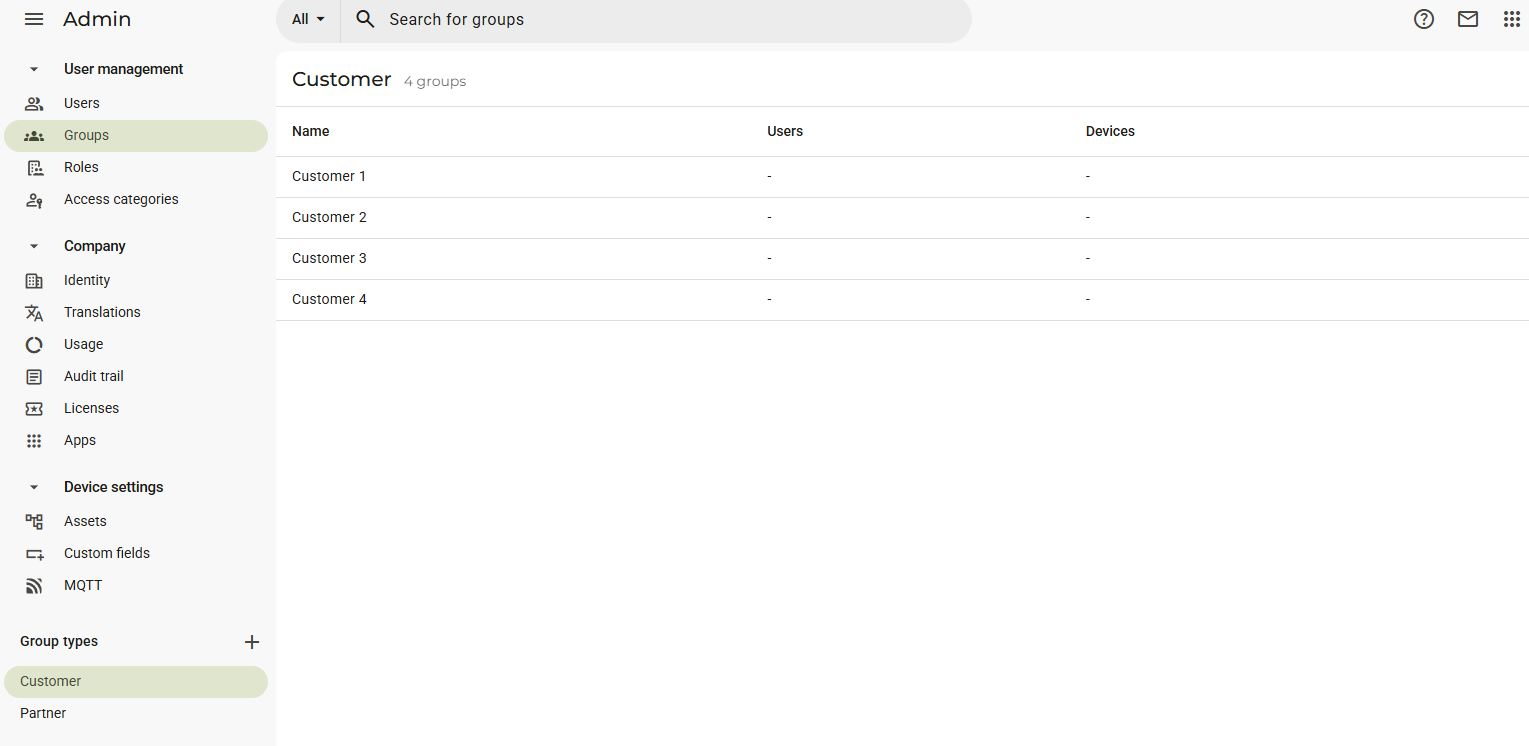
What we can see here is that we still have the possibility to set up group types on the bottom left and then assign groups to them, such as Customer 1, Customer 2, etc. to Customer. We can notice a few differences:
-
The groups do not need a hierarchical tree representation because the possibility of setting up subgroups is not available.
-
There is no color customization available for the group types.
-
To see the groups belonging to a different type, such as Partner, you will have to switch tab:
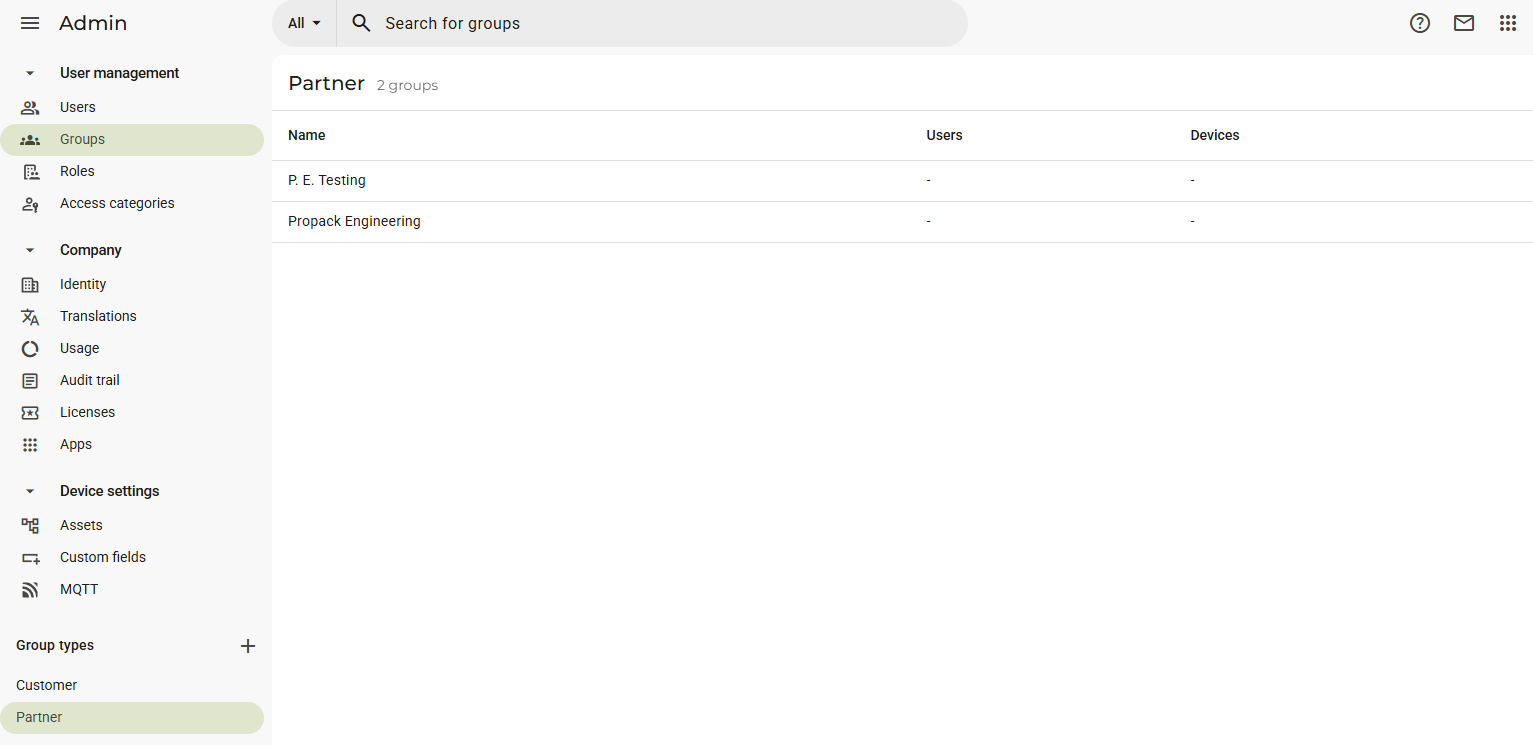
Consequently, the P. E. Testing subgroup would not be a subgroup in this case, but just a simple group, even if it is part of Propack Engineering.
User access structure explained
You have probably already noticed the UML diagram shown in the next section. Before taking a closer look to it, it is important to truly comprehend what the elements that populate it are.
Terminology
This is essentially what the User access management consists of:
- Agent: a device that you can see in the Fleet Manager.
- AgentMembership: from an abstract point of view, an agent membership consists of a single "subscription" performed by a group to an agent. This occurs when a group is assigned to an agent. Let's visualize it:
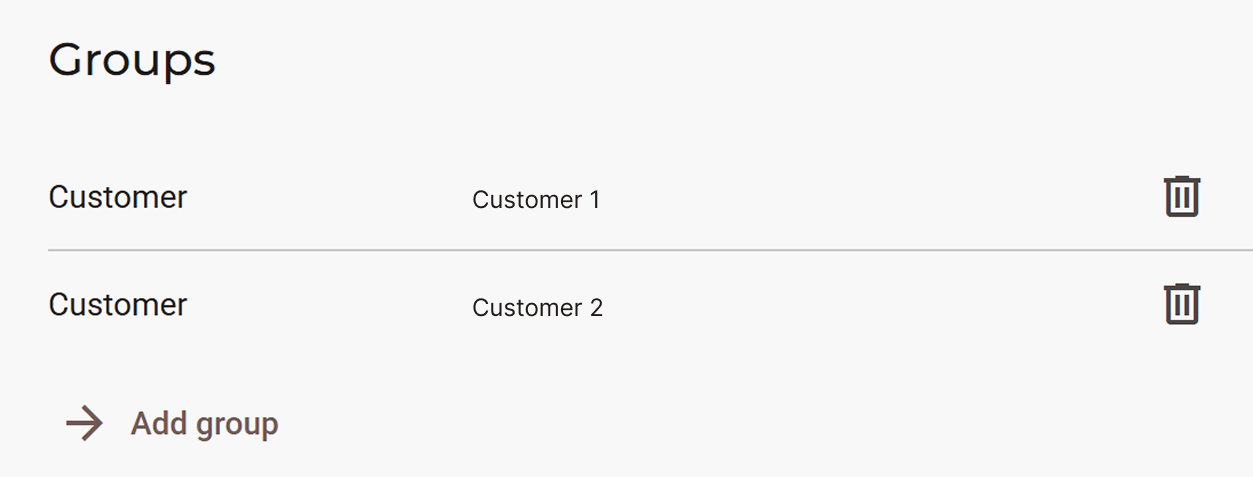
This section is found in Fleet Manager > Devices when a device of choice is selected. The action of "adding a group" creates the membership, making it so that a device is "subscribed" to an agent. In this case, this agent has two subscribers and therefore two memberships: Customer 1 and Customer 2. These groups will have access to this agent.
-
Group: just like in the general sense, groups are a way to classify units with shared characteristics. For example, Customer 1 could contain two different groups, one for the customer's sales department and one for the IT department, each with their respective users. They can be found in Admin > User management > Groups.
-
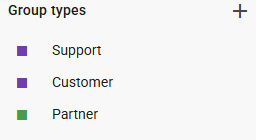
GroupType: it is used to define under which "label" a group is. Customer 1 and Customer 2 belong to the Customer group type. To check your group types, check the Group types section on the bottom left in the Groups section.
-
User: anyone who has access to a company. The full list of users can be seen in Admin > User management > Users.
-
UserMembership: similarly to an agent membership, it consists of the action of assigning a company-wide, group-specific or device-specific role to a user as seen in the picture below:
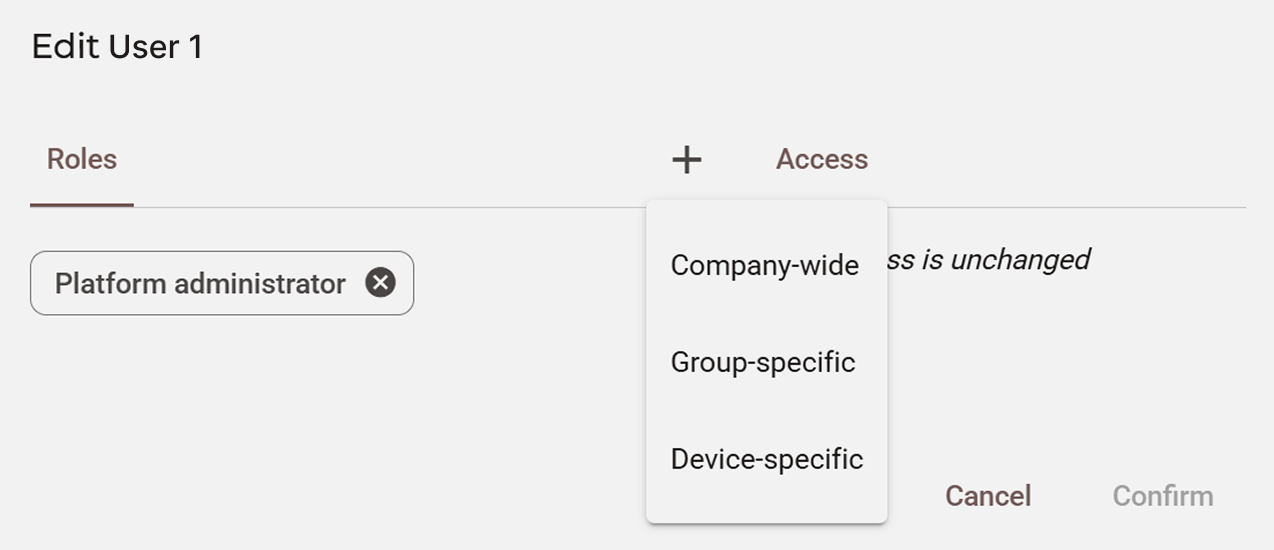
In Admin > User management > Users, when selecting "Edit user" (or "Invite User") and then on the "+" button, we will see that we can assign three types of roles to a user. In all three cases you will have to select a role, but in the case of group-specific and device-specific roles you will also have to add a group and a device respectively.
-
Role: a role determines which permissions a user possesses. You could, for example, create a "Packaging Machines Tester" role where the user can only manage those specific devices. By pressing the Add role button in the Roles section in Admin > User management, you will see an interface with multiple permissions that you can assign to a role.
-
Permissions: a permission determines what a user can or cannot do. An admin with a company-wide role will be able to manage more than just users or devices. A detailed explanation of what every permission does can be found in this support article.
-
Audience (Access Category): an access category defines what a user can or cannot do on a specific device that they have access to. As shown below, there are three types of access categories:
.](https://files.readme.io/83d368b17466b0727c1a86711d94402d106c4238b22700db170ca626e975ef96-image.png)
The type of access category is optional, but by selecting either Alarm, Page or Service you can decide what to grant access to. A detailed explanation can be found in this support article.
Diagram explanation
This UML diagram below shows the relationships between Role, Membership, Audience, Group, etc.
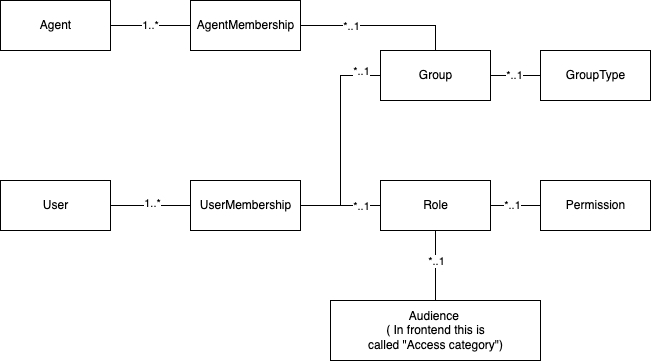
We can describe the relationships in this diagram as follows, starting from the top left:
- A single Agent can have multiple AgentMemberships.
- Multiple AgentMemberships can belong to a single Group, which can be assigned to multiple, different agents.
- Multiple Groups can have a single GroupType assigned to each of them.
- A single User can have multiple UserMemberships, meaning that a user can have multiple roles assigned to them.
- Multiple UserMemberships can belong to a single Group or Role, meaning that a single group or role can be assigned to multiple users.
- Multiple Roles can have one single Permission, meaning that a permission (e.g. Manage devices) can be assigned to multiple roles.
- Multiple Roles can have one single Access category, which can be reassigned to multiple, different roles.
All of these elements and their relationships can be manipulate through the API Endpoints, which will be listed in further subsections of this article. You will read about the most commonly used API endpoints, their verbs and their required fields.
Assuming that you already have an applicationId, companyId and bearerToken, you will now be able to call the following endpoints!
Group management
These are the endpoints concerning manipulation or retrieval of data belonging to groups.
Important notesPlease note that:
- The examples provided below are all based off of a company where the Subgroups module is available. In case you do not possess that module, the
colorfield in thetypeobject will havenullas value.- While using the API, you might happen to see a field called
managedBy. This is a legacy field, and therefore it should not be used. You can useparentinstead.- If a group has a company-wide membership, the boolean value
isCompanyGroupin anyGroupobject type in a JSON response will be set totrue. This will be visibile in any other JSON response containing aGroupobject, such as that of the Group and GroupList endpoints.- As seen in the Admin > Users section, if you want to assign a Company-wide role there will not be any "group" visible, but only "roles". For this reason, GroupRoleList only fetches roles making the `groups" field null.
- The AgentMembership and AgentMembershipList endpoints are only used for company-wide and group-specific access. That means that only
AgentorGrouptype objects will be contained in the JSON response.- For device-specific access, the group has a value for the
agentproperty that links it directly to the agent without using AgentMembership. This means that you have to create a new group for each agent that you want to assign that user to.- The
orderfield is used to determine the order of the group types in the menu on the bottom left in the Groups section.- For agent or asset device-specific groups, the
agentorassetfields will be filled in respectively. In our case the value isnullsince we do not have such groups. Additionally, thenamefield of the group will benull, and only thenamefield ofassetor ofparentandtypewill be filled in.
Important note: these groups can be created automatically due to an underlying mechanism within the platform's code. They are not intended for customers use, as they do not offer any particular value to them and, for this reason, they can be filtered out in the code if needed.
GroupList
| Verb | Goal | Required fields and IDs |
|---|---|---|
| GET | Retrieves a list of groups and subgroups. | You can use ?fields=name,type.*,agent.publicId,asset.publicId, parent.*,parent.type.* to return the needed data. |
| PATCH | Modifies one or more fields of one or more groups. If at least one field is added, the other two will be optional. | At least one among name, type and parent. |
| POST | Creates one or more new groups. Returns the publicId of each of the new groups. | The name and type and their publicId. |
| DELETE | Deletes one or more new groups. | The publicId of the group(s) that will be deleted. |
Please note: the Group endpoint is the non-list version of GroupList, and can be used to perform GET, PATCH and DELETE actions for a single group. There is no POST verb available for this endpoint.
Important note about assigning groupsIt is not possible to assign the company group as
parentto a childgroupduring POST or PATCH, as it will break the hierarchical tree graph. Let's take the Packaging Factory customer group we have mentioned in previous examples: when the group was created with a POST request, thenameandtypewere the only fields that were used. Even if the group does look like it is a child of My Company graphically, itsparentvalue will actually benull.
GroupTypeList
| Verb | Goal | Required fields and IDs |
|---|---|---|
| GET | Retrieves a list of group types. | You can use ?fields=* to return the needed data. |
| PATCH | Modifies one or more fields of one or more group types. If at least one field is added, the others will be optional. | At least one among name, description, order and color.
|
| POST | Creates one or more new group types. Returns the publicId of each of the new types. | The name and its publicId. |
| DELETE | Deletes one or more new group types. | The publicId of the type(s) that will be deleted. |
Additional fieldsThe other available and optional fields to use for the creation of a group type are
description,orderandcolor. They are not mandatory since they allow the creation of a new group type even if a user does not possess the Subgroups module. If a user has it, the values oforderandcolorwill be set to the ones belonging to the first element in the group type list:
Please note: the GroupType endpoint is the non-list version of GroupTypeList, and can be used to perform GET, PATCH and DELETE actions for a single group type. There is no POST verb available for this endpoint.
GroupRoleList
| Verb | Goal | Required fields and IDs |
|---|---|---|
| GET | Retrieves a list of roles in a group. | You can use ?fields=roles.*,roles.permissions.*,roles.audiences.* to return the needed data. |
Roles, access categories and permissions management
These endpoints handle the retrieval and manipulation of data belonging to roles, access categories and permissions.
RoleList
| Verb | Goal | Required fields and IDs |
|---|---|---|
| GET | Retrieves a list of roles in a company. | You can use ?fields=name,description,enforce2fa, enforceSso,permissions.*,audiences.* to return the needed data. |
| PATCH | Modifies one or more fields of one or more roles. If at least one field is added, the others will be optional. | At least one among name, description, enforce2fa and enforceSso, permissions and their publicId, audiences and their publicId. |
| POST | Creates one or more new roles. Returns the publicId of each of the new roles. | The publicId of the role and least one among name, description, enforce2fa, enforceSso, permissions and their publicId, audiences and their publicId. |
| DELETE | Deletes one or more new roles. | The publicId of the role(s) that will be deleted. |
Please note: the Role endpoint is the non-list version of RoleList, and can be used to perform GET, PATCH and DELETE actions for a single role. There is no POST verb available for this endpoint.
Notes about fields in RoleList
- Platform administrator is a default role, therefore only the
namecan be changed;- Category A is a default access category, and the
defaultfield value will always be true.
AudienceList
| Verb | Goal | Required fields, IDs or query params |
|---|---|---|
| GET | Retrieves a list of access categories. | You can use ?fields=description,name,default,type to return the needed data. |
| POST | Creates one or more new access categories. Returns the publicId of each of the new ones. | The name you want to give to the access category. |
| PATCH | Modifies one or more fields of one or more access categories. If at least one field is added, the other will be optional. | The publicId of the access category and at least one between name and description. |
| DELETE | Deletes one or more new access categories. | The publicId of the access category that will be deleted. |
Please note: the Audience endpoint is the non-list version of AudienceList, and can be used to perform GET, PATCH and DELETE actions for a single access category. There is no POST verb available for this endpoint.
PermissionList
| Verb | Goal | Required fields, IDs or query params |
|---|---|---|
| GET | Retrieves a list of permissions. | N/A |
Notes about permissions
- If the value
COMPANY_WIDE_ROLEis NOT present in thepermissionsarray, then that role is a group/device specific role;- The permissions retrieved by this endpoint are all default. It is not possible to create custom permissions.
User management
These endpoints handle the retrieval and manipulation of data concerning users.
UserList
Please note:
- If a user received an unlimited time invite, then the
expiresOnfield will benull. Additionally,otpauthRequiredwill only betrueif a user uses 2FA for the IXON Portal. - The User endpoint is the non-list version of UserList, and can be used to perform GET and DELETE actions for a single access category.
UserList - POSTUserList owns a POST verb as well: its purpose is to create a user only when said user has been invited to a company by another user. Since this action is performed through the interface of the portal, we advise against its use.
Membership management
These endpoints handle the retrieval and manipulation of data concerning memberships. In case you do not know what they are, please check this section.
AgentMembershipList
| Verb | Goal | Required fields and IDs |
|---|---|---|
| GET | Retrieves a list of agent memberships. | You can use ?fields=*,agent.*,group.* to return the needed data. |
| POST | Creates one or more new agent memberships. Returns the publicId of each of the new ones. | The publicId of both the agent and the group you want to assign to it. |
| PATCH | Modifies one or more fields of one or more agent memberships. | The publicId of both the agent and the group you want to assign to it. |
| DELETE | Deletes one or more new access categories. | The publicId of the agent membership(s) that will be deleted. |
Please note: the AgentMembership endpoint is the non-list version of AgentMembershipList, and can be used to perform GET, PATCH and DELETE actions for a single access category. There is no POST verb available for this endpoint.
UserMembershipList
| Verb | Goal | Required fields and IDs |
|---|---|---|
| GET | Retrieves a list of user memberships. | You can use ?fields=user.*,invite.*,group.*,role.*,expiresOn to return the needed data. |
| POST | Creates one or more new user memberships. Returns the publicId of each of the new ones. | The publicId of both the group and the role you want to assign the user to, and the publicId of either the user or the invite. If neither of these last two fields are used, you will receive an error. |
| PATCH | Modifies one or more fields of one or more user memberships. | The publicId of the membership and the group, role or expiresOn that you want to modify. |
| DELETE | Deletes one or more new user memberships. | The publicId of the user membership(s) that will be deleted. |
Please note: the UserMembership endpoint is the non-list version of UserMembershipList, and can be used to perform GET, PATCH and DELETE actions for a single access category. There is no POST verb available for this endpoint.
UserMembershipUserList - PUTIn Admin > User management > Users it is possible to edit users by clicking on the pencil icon on the right-end side of a user's section. This endpoint is called when clicking on "Confirm" after performing any type of change. Since these changes can mainly be performed through the interface of the portal, we advise against its use.
Invite management
These endpoints handle the retrieval and manipulation of data concerning invites.
InviteList
| Verb | Goal | Required fields and IDs |
|---|---|---|
| GET | Retrieves a list of existing invites. | You can use ?fields=*,memberships.* to return the needed data. |
| POST | Creates one or more new invites. Returns either an error or success response. | The emailAddress of the user you want to invite and the publicId of both the group and the role you want to invite them to (inside groupRoles).
|
| DELETE | Deletes one or more new user invites. | The publicId of the invite(s) that will be deleted. |
Please note: the Invite endpoint is the non-list version of InviteList, and can be used to perform GET and DELETE actions for a single invite. There is no POST verb available for this endpoint.
InviteResendList
| Verb | Goal | Required fields and IDs |
|---|---|---|
| POST | Resends invites to one or more users. Returns either an error or success response. | The publicId of the existing invite(s).
|
Please note: the InviteResend endpoint is the non-list version of InviteResendList, and can be used to perform a POST action for a single invite.
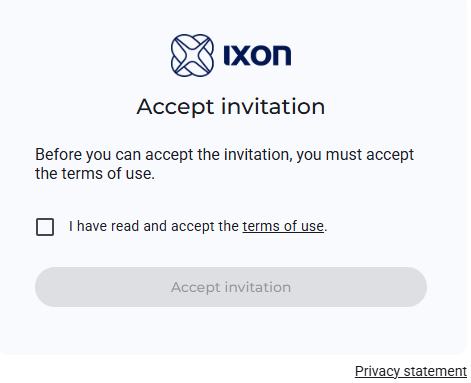
InviteFinish - POSTThis endpoint is used to conclude the invitation process the user is redirected to through the invitation email, and it's called by pressing the Accept invitation button, which can be pressed after reading and accepting the terms of use. Since this action can mainly be performed through the invitation email, we advise against its use.
How-tos and use cases
This section provides practical, step-by-step guides for common tasks performed on the portal, demonstrating how to use our API endpoints together to achieve a specific outcome. Real use case examples will be provided along the way.
How to create a new group and then assign it to a device
Goal: create a new group called Headquarters Testers belonging to the General Testing type, and assign it to the Box Grabber machine.
What you will need:
- The
publicIdof the group type you will assign to the new group. - The
publicIdof the agent you wish to link the group to. - The
publicIdof the new group that will be linked to the agent.
Step 1 - Create the new group type
Since we do not yet possess this group type, we will need to create it using the POST Request of the GroupTypeList endpoint and the following body parameters:
curl --location 'https://portal.ixon.cloud/api/group-types' \
--header 'Api-Application: $applicationId' \
--header 'Api-Company: $companyId' \
--header 'Api-Version: 2' \
--header 'Authorization: Bearer $bearerToken' \
--data '
[
  {
    "name": "General Testing",
    "description": "General test group."
  }
]
'
{
"type": "CreateResponse",
"data": [
{
"publicId": "$newGroupTypePublicId"
}
],
"moreAfter": null,
"status": "success"
}Step 2 - Create the new group
After retrieving the publicId of the new General Testing group type, you can create a new group by using the POST Request of the GroupList endpoint. This group is not a subgroup, so it does not need a parent field in its request body:
curl --location 'https://portal.ixon.cloud/api/groups' \
--header 'Api-Application: $applicationId' \
--header 'Api-Company: $companyId' \
--header 'Api-Version: 2' \
--header 'Authorization: Bearer $bearerToken' \
--data '[
  {
    "type": {
      "publicId": "$newGroupTypePublicId"
    },
    "name": "Headquarters Testers"
    }
]'
{
"type": "CreateResponse",
"data": [
{
"publicId": "$newGroupPublicId"
}
],
"moreAfter": null,
"status": "success"
}Step 3 - Create a new agent membership
As stated at the beginning of the article, an agent membership consists of assigning a group to a device. To retrieve an agent's ID, follow the instructions in this knowledge article. After retrieving it, all we need to do now is use the agent's ID and group's ID we obtained in Step 2 to link our new group to a device by calling an AgentMembershipList POST Request:
curl --location 'https://portal.ixon.cloud/api/agents/memberships' \
--header 'Api-Application: $applicationId' \
--header 'Api-Company: $companyId' \
--header 'Api-Version: 2' \
--header 'Authorization: Bearer $bearerToken' \
--data '
[
  {
    "agent": {
      "publicId": "$agentPublicId"
    },
    "group": {
      "publicId": "$newGroupPublicId"
    }
  }
]
'
{
"type": "CreateResponse",
"data": [
{
"publicId": "$membershipPublicId"
}
],
"moreAfter": null,
"status": "success"
}After these steps, we can navigate to Fleet Manager > Devices > Box Grabber (or device of choice) and see that we have successfully linked our group to the machine:

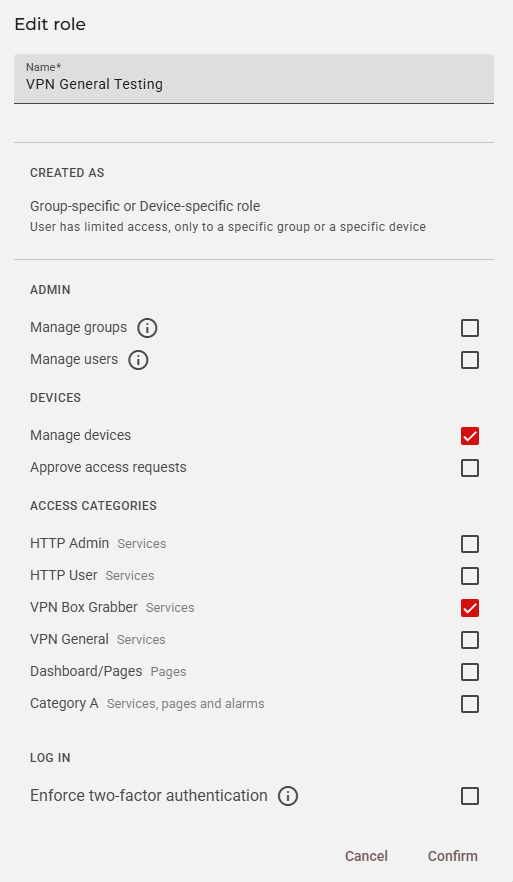
How to create a new access category and assign it to a new role
Goal: create a new access category called VPN Box Grabber and assign it to the VPN General Testing role, which we will create as a device-specific role.
What you will need:
- The
publicIdof the new access category that you will assign to the role. - The
publicIdof the permission that we want to give to the role.
Step 1 - Create the new access category
We will use the AudienceList POST Request to create a new access category. Since we are using it to manage a VPN Access, it will be of "service" type:
curl --location 'https://portal.ixon.cloud/api/audiences' \
--header 'Api-Application: $applicationId' \
--header 'Api-Company: $companyId' \
--header 'Api-Version: 2' \
--header 'Authorization: Bearer $bearerToken' \
--data '
[
  {
    "name": "VPN Box Grabber",
    "type": "service"
  }
]
'
{
"type": "CreateResponse",
"data": [
{
"publicId": "$newAccessCategoryId"
}
],
"moreAfter": null,
"status": "success"
}Note: the description field you might find in the endpoint web-page is not used and it will have no effect on the interface in the Portal. Therefore, we recommend omitting it.
Step 2 - Get the list of possible permissions
Before creating a new role, we will need to retrieve the default list of permissions available via a GET Request of PermissionList:
curl --location 'https://portal.ixon.cloud/api/permissions' \
--header 'Api-Version: 2' \
--header 'accept: application/json'
{
"type": "Permission",
"data": [
{
"publicId": "APPROVE_ACCESS_REQUESTS"
},
{
"publicId": "COMPANY_ADMIN"
},
{
"publicId": "COMPANY_WIDE_ROLE"
},
{
"publicId": "DEVELOP_APP"
},
{
"publicId": "MANAGE_AGENT"
},
{
"publicId": "MANAGE_AGENT_TEMPLATE"
},
{
"publicId": "MANAGE_APP"
},
{
"publicId": "MANAGE_ASSET_LIBRARY"
},
{
"publicId": "MANAGE_BRANDING"
},
{
"publicId": "MANAGE_COMPANY"
},
{
"publicId": "MANAGE_GROUP"
},
{
"publicId": "MANAGE_LICENCE"
},
{
"publicId": "MANAGE_PAGE"
},
{
"publicId": "MANAGE_USER"
},
{
"publicId": "NOTIFY_EXPIRING_LICENCE"
},
{
"publicId": "TRANSFER_AGENT"
},
{
"publicId": "VIEW_AUDIT_LOGS"
}
],
"moreAfter": null,
"status": "success"
}In our case, we will choose MANAGE_AGENT since the role will be device-specific. This value corresponds to the Manage devices option found in Admin > Roles > Add new role > Devices.
Step 3 - Create the new role
After obtaining the publicId of the new access category and of the permission we need, we can create the new role that we will assign it to by using the POST Request of the RoleList endpoint:
curl --location 'https://portal.ixon.cloud/api/roles' \
--header 'Api-Application: $applicationId' \
--header 'Api-Company: $companyId' \
--header 'Api-Version: 2' \
--header 'Authorization: Bearer $bearerToken' \
--data '
[
  {
    "name": "VPN General Testing",
    "description": "Role for generic VPN Testing.",
    "enforce2fa": false,
    "enforceSso": false,
    "permissions": [
      {
        "publicId": "MANAGE_AGENT"
      }
    ],
    "audiences": [
      {
        "publicId": "$newAccessCategoryPublicId"
      }
    ]
  }
]
'
{
"type": "CreateResponse",
"data": [
{
"publicId": "$rolePublicId"
}
],
"moreAfter": null,
"status": "success"
}In this case, we decided to not enforce 2FA or SSO, therefore their values are false. We can now visualize the new role in Admin > Roles:
How to invite a user to your company
Goal: inviting a new user to the company and assign them to the General Testing group with a VPN General Testing role.
What you will need:
- The
publicIdof the role you want to assign to the user. - The
publicIdof the group you want to assign the user to. - The user's
emailAddress.
Step 1 - Retrieve the group and role public IDs
You can refer to these previous How-tos sections to retrieve the group ID and the role ID respectively. When you have the necessary publicIds, you can proceed to the next step.
Step 2 - Invite the user
Assuming that we have the email of the user we want to invite, we can do so by using the POST Request of the InviteList endpoint. It is important to note that the required Api-Branding header should contain the URL of your company. The default is portal.ixon.cloud, but the entered URL should be different if you use White Label Premium. It is also possible to include a message field:
curl --location 'https://portal.ixon.cloud/api/invites' \
--header 'Api-Application: $applicationId' \
--header 'Api-Company: $companyId' \
--header 'Api-Version: 2' \
--header 'Api-Branding: portal.ixon.cloud' \
--header 'Authorization: Bearer $bearerToken' \
--data-raw '
[
  {
    "emailAddress": "[email protected]",
    "message": "You have been invited to the company.",
    "groupRoles": [
      {
        "group": {
          "publicId": "$groupPublicId"
        },
        "role": {
          "publicId": "$rolePublicId"
        }
      }
    ]
  }
]
'
{
"type": "InviteResponse",
"data": {
"invites": [
{
"publicId": "$invitePublicId"
}
],
"userMemberships": [
{
"publicId": "$userMembershipPublicId"
}
]
},
"status": "success"
}As you can see, the response will return the publicId of the invite and that of the userMembership that was applied. An email with the invite link will be sent to the entered email address. That person can create an account to the IXON Cloud by clicking on the displayed link if they currently do not have an IXON Cloud account.
How to get a list of users
Goal: retrieving a list of users to keep in your company in your own administration.
What you will need: standard headers (applicationId, companyId, bearerToken).
To obtain a list of users you only have to follow one single step consisting of sending a GET request to the UserList endpoint:
curl --location 'https://portal.ixon.cloud/api/users?fields=publicId,name,emailAddress,lastSeenOn%,memberships.*,otpauthRequired' \
--header 'Api-Application: $applicationId' \
--header 'Api-Company: $companyId' \
--header 'Api-Version: 2' \
--header 'Authorization: Bearer $bearerToken'
{
"type": "User",
"data": [
{
"publicId": "$userPublicId",
"name": "User 1",
"emailAddress": "[email protected]",
"lastSeenOn": "2025-08-06T11:23:57Z",
"memberships": [
{
"publicId": "$userMembership",
"expiresOn": null
}
],
"otpauthRequired": true
},
{
"publicId": "$userPublicId",
"name": "User 2",
"emailAddress": "[email protected]",
"lastSeenOn": "2025-08-06T11:35:03Z",
"memberships": [
{
"publicId": "$userMembershipPublicId",
"expiresOn": null
},
{
"publicId": "$userMembershipPublicId",
"expiresOn": "2025-08-06T21:48:00Z"
}
],
"otpauthRequired": false
},
{
"publicId": "$userPublicId",
"name": "User 3",
"emailAddress": "[email protected]",
"lastSeenOn": "2025-08-06T07:43:44Z",
"memberships": [
{
"publicId": "$userMembershipPublicId",
"expiresOn": null
},
{
"publicId": "$userMembershipPublicId",
"expiresOn": "2025-08-06T21:48:00Z"
}
],
"otpauthRequired": true
}
],
"moreAfter": null,
"status": "success"
}How to remove a user
Goal: removing a user from your company.
What you will need:
- The
publicIdof the user you want to remove.
The UserList endpoint can be used to remove one or multiple users as well. Assuming that you have obtained the user ID with the GET request in the example above, you now have to use it in the DELETE request:
curl --location 'https://portal.ixon.cloud/api/users' \
--header 'Api-Application: $applicationId' \
--header 'Api-Company: $companyId' \
--header 'Api-Version: 2' \
--header 'Authorization: Bearer $bearerToken'
--data '
[
  {
    "publicId": "$userPublicId"
  }
]'
{
"type": "Null",
"data": null,
"status": "success"
}