How to implement a custom SSO authentication login flow
This tutorial shows how to implement an SSO login flow in SvelteKit using route pages to request authentication, handle the access token response and redirect to a custom page.
Required modulesYou will need the API Integration module and, in case of custom URL, the White Label Premium module. Check your modules at Admin > Licenses. To obtain this module, contact your IXON account manager or IXON distributor.
Please note: to get more information about SSO-related modules, check the SSO login on custom domain support article and the links attached within it.
Use cases and needs
Normally, in IXON's environment, logging in with SSO Authentication implies that you will be immediately redirected to the IXON Portal, for example to the /devices page. This is done by making the SSO provider's API endpoints and IXON endpoints work together. Regardless of which provider you will use (Google, Microsoft, or a custom domain's provider), the last step to be successfully redirected to the landing page consists of generating a one-time useaccess token that grants access to the user.
Thanks to SvelteKit Routes, you can create a simple redirection flow that:
- Requests a login from your SSO provider.
- Handles the provider’s callback in an intermission handler page.
- Redirects the user immediately to a custom URL path.
All of the above is applicable to custom domain URLs as well (White Label Premium license).
Before you start
To create this project, you will need:
- A code editor. This tutorial uses and recommends Visual Studio Code.
- Node.js (v18 or later recommended).
- npm (comes with Node.js).
- Basic knowledge of Svelte and SvelteKit.
- An IXON API Application ID. Please note: For this implementation, it is not possible to use an Application ID generated through a Service Account. Follow the instructions to request a regular one.
- An Identity Provider public ID, which can be obtained by querying the SsoIdentityProviderList endpoint:
curl --request GET \
     --url https://portal.ixon.cloud/api/sso/identity-providers \
     --header 'Api-Application: $applicationId' \
     --header 'Api-Version: 2' \
     --header 'accept: application/json'
{ "type": "SsoIdentityProvider", "data": [ { "publicId": "$microsoftIdentityPublicId", "name": "Microsoft" }, { "publicId": "$googleIdentityPublicId", "name": "Google" } ], "moreAfter": null, "status": "success" }
White Labeling: identity provider for a custom domain
In case your company possesses White Label Premium and uses its own domain, you will need to add the Api-Branding header to the SsoIdentityProviderList call previously shown. The value of the company branding consists of your custom URL. See the following example:
curl --request GET \
     --url https://portal.ixon.cloud:443/api/sso/identity-providers \
     --header 'Api-Application: $applicationId' \
     --header 'Api-Branding: insight.propack-machinery.com' \
     --header 'Api-Version: 2' \
     --header 'accept: application/json'
{
"type": "SsoIdentityProvider",
"data": [
{
"publicId": "$companyBrandingIdentityPublicId",
"name": "Propack Machinery SSO"
}
],
"moreAfter": null,
"status": "success"
}To check if your company possesses the White Label Premium license, navigate to Admin > Licenses. If the license is present, in Admin > Identity you should see the White Label Premium section at the bottom of the page. You can check the following support articles for more information about this topic: IXON Cloud Custom Branding and IXON Cloud Custom Domain.
Once you have everything you need to continue, you can start setting up the project.
Project creation
To create a SvelteKit project, please follow the instructions found in this official tutorial. Once you will run the npx sv create my-app command you will be prompted to choose a template, whether you want TypeScript type checking or not and more dependencies. These are the options that we have used for this example:
- SvelteKit minimal;
- Typescript syntax;
- prettier;
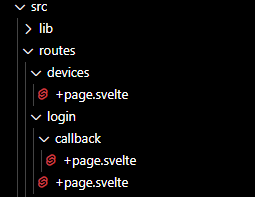
Additionally, here is a preview of how your project's src/routes folder structure will look:
Recommended extensionIt is highly recommended to install the Svelte for VS Code extension, as it will make using Svelte and SvelteKit easier.
Step 1 - Create the login page
This file will be created inside the login folder, and will trigger the login process by making a request to your SSO API and then redirecting the user to the provider’s login page. This is done through IXON's SsoAuthenticationRequestList endpoint with a POST request that contains the publicId of the identity provider and the redirect URL pointing to the callback folder. Note: in case your company possesses White Label Premium and a different domain URL, refer to the yellow note at the end of this section.
In this example, we used Google login's page:
<script lang="ts">
    let error = $state<string | null>(null);

    async function requestLogin() {
        try {
            const res = await fetch('https://portal.ixon.cloud/api/sso/authentication/request', {
                method: 'POST',
                headers: {
                    'Api-Application': '$applicationId',
                    'Api-Version': '2',
                    'accept': 'application/json',
                    'content-type': 'application/json'
                },
                body: JSON.stringify({
                    identityProvider: {
                        publicId: '$identityProviderPublicId'
                    },
                    redirectUrl: 'http://localhost:5173/login/callback'
                })
            });

            if (!res.ok) throw new Error(`HTTP ${res.status}`);

            const json = await res.json();
            console.log('Login request response:', json);

            const url = json?.data?.url;
            if (url && typeof url === 'string') {
                // Redirect in the same tab for SSO flow
                window.location.href = url;
            } else {
                throw new Error('No valid URL in SSO response');
            }

        } catch (err: unknown) {
            if (err instanceof Error) {
                error = err.message;
            } else {
                error = String(err);
            }
            console.error('Login request failed:', err);
        }
    }

    // Run automatically when page loads
    $effect(() => {
        requestLogin();
    });
</script>

{#if error}
    <p style="color:red">{error}</p>
{:else}
    <p>Redirecting to SSO provider...</p>
{/if}
Authentication in case of custom company brandingIn the White Labeling: identity provider for a custom domain section, we mentioned how, in case of a custom URL, the
Api-Brandingheader is necessary to generate the correctpublicIdof the SSO provider. To be able to use thepublicIdof the SSO provider in the SsoAuthenticationRequestList API call, you will need to add theApi-Brandingto the headers. Not doing so will generate invalid values forcodeandstate, which are subsequently used to generate the needed access-token, and will return an error.Let's take the previous code snippet as an example, the headers will look like this:
... rest of the code ...

  headers: {
      'Api-Application': '$applicationId',
      'Api-Version': '2',
      'Api-Branding': 'insight.propack-machinery.com', // <--- Custom URL
      'accept': 'application/json',
      'content-type': 'application/json'
  },

... rest of the code ...
Step 2 - Create the callback page
This page handles the redirect from the SSO provider, requests the access token SsoAccessTokenList endpoint, and immediately redirects the user to the desired page, which in our case is in /devices. It will also safely store the token in the local storage for later use in other possible routes:
<script lang="ts">
    import { page } from '$app/stores';

    let error = $state<string | null>(null);

    async function fetchAccessToken(code: string, state: string) {
        try {
            const res = await fetch('https://portal.ixon.cloud/api/sso/access-token', {
                method: 'POST',
                headers: {
                    'Api-Application': '$applicationId',
                    'Api-Version': '2',
                    'accept': 'application/json',
                    'content-type': 'application/json'
                },
                body: JSON.stringify({
                    ssoAuthentication: { code, state },
                    expiresIn: 3600
                })
            });

            if (!res.ok) throw new Error(`HTTP ${res.status}`);

            const json = await res.json();
            console.log('Access token response:', json);

            const token = json?.data?.secretId;
            if (token && typeof token === 'string') {
                // Store token securely in localStorage
                localStorage.setItem('bearerToken', token);

                // Redirect immediately
                window.location.href = "http://localhost:5173/devices";
            } else {
                throw new Error('No secretId found in response');
            }
        } catch (err: unknown) {
            error = err instanceof Error ? err.message : String(err);
            console.error('Failed to get access token:', err);
        }
    }

    $effect(() => {
        const query = $page.url.searchParams;
        const code = query.get('code');
        const state = query.get('state');

        if (code && state) {
            fetchAccessToken(code, state);
        } else {
            error = 'Missing code or state in URL';
        }
    });
</script>

{#if error}
    <p style="color:red">{error}</p>
{/if}
Required fields for SsoAccessTokenListFor this endpoint we will only need the
codeandstatefields contained in thessoAuthenticationobject and theexpiresInfield. The rest of the fields shown in the API endpoint documentation page are optional.
Step 3 - Create the landing page
This is your target landing page after authentication! This route checkslocalStorage for the bearerToken. If not found, it redirects to /login.
<script lang="ts">
    import { onMount } from 'svelte';

    let token: string | null = null;

    onMount(() => {
        token = localStorage.getItem('bearerToken');
        if (!token) {
            // No token? Redirect to login page
            window.location.href = '/login';
        }
    });
</script>

{#if token}
    <h1>Devices Page</h1>
    <p>Welcome! You are now logged in.</p>
{/if}
How the flow works
To sum everything up:
- User visits
/login. - SvelteKit calls IXON's SSO API endpoint and redirects the user to the SSO provider.
- The SSO provider redirects back to
/complete?code=...&state=.... /callbackexchanges the code for an access token and stores it safely in the local storage.- If successful, it redirects to
/deviceswithout showing the token. /devicesdisplays the user’s device page.
Updated 3 months ago