Manage MQTT Brokers and clients
This article will provide information about how the creation and management of MQTT Brokers configurations on the IXON Portal via API endpoints.
Required roleThe Platform administrator role is required to add an MQTT broker in the Admin. If you do not have this permission, new MQTT brokers cannot be added in the Admin.
Introduction
This guide covers how to manage your MQTT brokers using our API endpoints. You'll learn the essential requests for creating, monitoring, patching and administering your brokers to automate your workflows. More general details and useful information about the use of MQTT brokers in the IXON Portal are available in this support article.
Assuming that you have the Platform administrator role, an Application ID, Company ID and Bearer Token, you will be able to use all the following endpoints and their verbs.
MqttBrokerList
| Verb | Goal | Required fields and IDs |
|---|---|---|
| GET | Retrieves a list of MQTT Brokers. | You can use ?fields=_,company.publicId,clients.*,clients.company. publicId,clients.name,clients.mqttBroker.publicId,messageFormat to return the needed data. |
| POST | Creates one or more new MQTT brokers. Returns the publicId of each of the new brokers. | The name, the host, the port and the messageFormat. The certauth field is not mandatory since not all ports need certificates for security, but might be needed for your specific broker. |
| PATCH | Modifies one or more fields of one or more MQTT brokers. | The publicId of the broker(s) that you want to modify. |
| DELETE | Deletes one or more new MQTT brokers. | The publicId of the broker(s) that will be deleted. |
Please note: the MqttBroker endpoint is the non-list version of MqttBrokerList, and can be used to perform GET, PATCH and DELETE action for a single MQTT broker by providing its publicId. There is no POST verb available for this endpoint.
MqttBrokerClientList
| Verb | Goal | Required fields and IDs |
|---|---|---|
| POST | Creates one or more new MQTT broker clients. Returns the publicId of each of the new clients. | The brokerId as path parameter and the nameof the client. username, password, clientCert and clientKey are not mandatory since not all ports need certificates for security, but might be needed for your specific broker. |
| PATCH | Modifies one or more fields of one or more MQTT broker clients. | The brokerId as path parameter and the publicId of the client(s) that you want to modify. |
| DELETE | Deletes one or more new MQTT broker clients. | The brokerId as path parameter and the publicId of the client(s) that will be deleted. |
Please note: the MqttBrokerClient endpoint is the non-list version of MqttBrokerClientList, and can be used to perform PATCH and DELETE action for a single MQTT broker client by providing its publicId. There is no POST verb available for this endpoint.
MqttBrokerClientMessage
| Verb | Goal | Required fields and IDs |
|---|---|---|
| POST | Creates a request that verifies the communication with an MQTT broker. | The brokerId and theclientIdas path parameters, the publicId of the device that you want to test and thetopic. |
More details about this endpoint are available in the following section.
How-tos and use cases
This section provides practical, step-by-step guides for real use cases performed on the portal, showing how to use our API endpoints together to create and manage MQTT broker configurations.
How to create a new MQTT broker configuration
Goal: create a new MQTT broker and its client. In this example, we will use Eclipse Mosquitto.
What you will need:
- The
nameof the MQTT broker; - The
hostof the MQTT broker; - The
portof the MQTT broker (e.g.1883,8883, etc.); - (Optional) The
certauthin case you need encryption, like for port8883; - The
messageFormat. IXON supports Sparkplug B e Sparkplug B JSON; - A WSL of your choice. This example uses Ubuntu 24.04.
Notes aboutcertauthBefore you start, here are some things to point out about certificates and how to use them:
- In this example (and with other public brokers) you will need to use port
8883since the IXON Portal will not allow unencrypted connections to brokers;- In the Portal, when a certificate (with a format such as
.crtis uploaded, it will be converted automatically in a.txtfile containing newlines. The pattern in the API MqttBrokerList POST/PATCH endpoint supports\n,\r\nand\r. This means that if you want to create a broker or update an existing one with a certificate you will need to paste the contents of a .txt file that has already been converted. Keep reading this section to learn more about it.
Step 1: download the correct certificate
Install Mosquitto Tools on WSL
To get the correct, up-to-date tools, you must first add the official Mosquitto repository's security key:
sudo wget https://repo.mosquitto.org/debian/mosquitto-repo.gpg -O /etc/apt/keyrings/mosquitto-repo.gpg--2025-08-21 15:45:15-- https://repo.mosquitto.org/debian/mosquitto-repo.gpg
Resolving repo.mosquitto.org (repo.mosquitto.org)... 85.119.83.194, 2001:ba8:1f1:f271::2
Connecting to repo.mosquitto.org (repo.mosquitto.org)|85.119.83.194|:443... connected.
HTTP request sent, awaiting response... 200 OK
Length: 2278 (2.2K) [application/octet-stream]
Saving to: ‘/etc/apt/keyrings/mosquitto-repo.gpg’
/etc/apt/keyrings/mosquitto-r 100%[=================================================>] 2.22K --.-KB/s in 0s
2025-08-21 15:45:16 (246 MB/s) - ‘/etc/apt/keyrings/mosquitto-repo.gpg’ saved [2278/2278]Then create the repository's source package:
echo "deb [signed-by=/etc/apt/keyrings/mosquitto-repo.gpg] https://repo.mosquitto.org/debian buster main" | sudo tee /etc/apt/sources.list.d/mosquitto.list > /dev/nullAnd finally, update your package list and install the clients. In this example, this step has already been performed, therefore the message states how mosquitto-clients is already up-to-date:
sudo apt update
sudo apt install mosquitto-clients
Hit:1 https://repo.mosquitto.org/debian buster InRelease
Hit:2 https://ppa.launchpadcontent.net/deadsnakes/ppa/ubuntu noble InRelease
Hit:3 http://archive.ubuntu.com/ubuntu noble InRelease
Get:4 http://archive.ubuntu.com/ubuntu noble-updates InRelease [126 kB]
Get:5 http://archive.ubuntu.com/ubuntu noble-backports InRelease [126 kB]
Get:6 http://archive.ubuntu.com/ubuntu noble-updates/main amd64 Packages [1350 kB]
Get:7 http://archive.ubuntu.com/ubuntu noble-updates/main Translation-en [268 kB]
Get:8 http://archive.ubuntu.com/ubuntu noble-updates/main amd64 Components [175 kB]
Get:9 http://archive.ubuntu.com/ubuntu noble-updates/universe amd64 Components [377 kB]
Get:10 http://archive.ubuntu.com/ubuntu noble-updates/restricted amd64 Packages [1723 kB]
Get:11 http://archive.ubuntu.com/ubuntu noble-updates/restricted Translation-en [383 kB]
Get:12 http://archive.ubuntu.com/ubuntu noble-updates/restricted amd64 Components [212 B]
Get:13 http://archive.ubuntu.com/ubuntu noble-updates/multiverse amd64 Components [940 B]
Get:14 http://archive.ubuntu.com/ubuntu noble-backports/main amd64 Components [7068 B]
Get:15 http://archive.ubuntu.com/ubuntu noble-backports/universe amd64 Components [19.2 kB]
Get:16 http://archive.ubuntu.com/ubuntu noble-backports/restricted amd64 Components [216 B]
Get:17 http://archive.ubuntu.com/ubuntu noble-backports/multiverse amd64 Components [212 B]
Get:18 http://security.ubuntu.com/ubuntu noble-security InRelease [126 kB]
Get:19 http://security.ubuntu.com/ubuntu noble-security/main amd64 Components [21.6 kB]
Get:20 http://security.ubuntu.com/ubuntu noble-security/universe amd64 Components [52.2 kB]
Get:21 http://security.ubuntu.com/ubuntu noble-security/restricted amd64 Components [212 B]
Get:22 http://security.ubuntu.com/ubuntu noble-security/multiverse amd64 Components [212 B]
Fetched 4756 kB in 19s (256 kB/s)
Reading package lists... Done
Building dependency tree... Done
Reading state information... Done
78 packages can be upgraded. Run 'apt list --upgradable' to see them.
Reading package lists... Done
Building dependency tree... Done
Reading state information... Done
mosquitto-clients is already the newest version (2.0.18-1build3).
0 upgraded, 0 newly installed, 0 to remove and 78 not upgraded.Find and download the correct certificate
The certificate needed is the Certificate Authority (CA) that signed the server's certificate. For the public test.mosquitto.org broker, you can download it directly. This certificate is what your client uses to verify the server's identity. Navigate to a folder you can easily find and run the following command:
wget http://test.mosquitto.org/ssl/mosquitto.org.crtURL transformed to HTTPS due to an HSTS policy
--2025-08-21 16:11:18-- https://test.mosquitto.org/ssl/mosquitto.org.crt
Resolving test.mosquitto.org (test.mosquitto.org)... 5.196.78.28, 2001:41d0:a:6f1c::1
Connecting to test.mosquitto.org (test.mosquitto.org)|5.196.78.28|:443... connected.
HTTP request sent, awaiting response... 200 OK
Length: 1452 (1.4K) [application/x-x509-ca-cert]
Saving to: ‘mosquitto.org.crt’
mosquitto.org.crt. 100%[=================================================>] 1.42K --.-KB/s in 0s
2025-08-21 16:11:18 (228 MB/s) - ‘mosquitto.org.crt’ saved [1452/1452]Now that you have the right certificate, you can proceed with its conversion!
Step 2: convert the certificate
As explained in the note above, to create a valid POST request you will need to paste a formatted string containing the correct certificate for your broker. To convert the multi-line certificate into a single line with \n characters, you can use a simple command in your WSL terminal.
Navigate to the same folder where you saved the certificate and run this command to read the certificate file and output it in the desired format:
awk 'NF {printf "%s\\n", $0}' mosquitto.org.crt > mosquitto-org-certificate.txt-----BEGIN CERTIFICATE-----\nMIIEAzCCAuugAwIBAgIUBY1hlCGvdj4NhBXkZ/uLUZNILAwwDQYJKoZIhvcNAQEL\nBQAwgZAxCzAJBgNVBAYTAkdCMRcwFQYDVQQIDA5Vbml0ZWQgS2luZ2RvbTEOMAwG\nA1UEBwwFRGVyYnkxEjAQBgNVBAoMCU1vc3F1aXR0bzELMAkGA1UECwwCQ0ExFjAU\nBgNVBAMMDW1vc3F1aXR0by5vcmcxHzAdBgkqhkiG9w0BCQEWEHJvZ2VyQGF0Y2hv\nby5vcmcwHhcNMjAwNjA5MTEwNjM5WhcNMzAwNjA3MTEwNjM5WjCBkDELMAkGA1UE\nBhMCR0IxFzAVBgNVBAgMDlVuaXRlZCBLaW5nZG9tMQ4wDAYDVQQHDAVEZXJieTES\nMBAGA1UECgwJTW9zcXFpdHRvMQswCQYDVQQLDAJDQTEWMBQGA1UEAwwNbW9zcXF1\naXR0by5vcmzEfzAdBgkqhkiG9w0BCQEWEHJvZ2VyQGF0Y2hvby5vcmcwggEjMA0G\nCSqGSIb3DQEBAQUAA4IBDwAwggEKAoIBAQDBNDCpiM30zsJCi090xx3vjm3YmNpj4\nFmYPphN/fMlz3mBmJ+AhFvI/p/Le1ZzxLZuhbp3Osex/EnRX/3ajfbQYkD0HtTUVP\nTe3xda/Lm3JFfaHjkWw7jBwcauQZjpGINHapHRlpiCZsquAthOgxW9SgDgYlGzEA\ns06pkEFiMw+qDfLo/sxFKB6vQlFekMeCymjLCbNwPJyqyhFmPWwio/PDMruBTzPH\n3cioBnrJWKXc3OjXdLGFJOfj7pP0j/dr2LH72eSvv3PQQFl90CZPFhrCUcRHSSxo\nE6yjGOdnz7f6PveLIB574kQORwt8ePn0yidrTC1ictikED3nHYhMUOUCAwEAAaNT\nMFEwHQYDVR0OBBYEFPVV6xBUFPiGKDyo5V3+Hbh4N9YSMB8GA1UdIwQYMBaAFPVV\n6xBUFPiGKDyo5V3+Hbh4N9YSMA8GA1UdEwEB/wQFMAMBAf8wDQYJKoZIhvcNAQEL\nBQADggEBAGa9kS21N70ThM6/Hj9D7mbVxKLBjVWe2TPsGfbl3rEDfZ+OKRZ2j6AC\n6r7jb4TZO3dzF2p6dgbrlU71Y/4K0TdzIjRj3cQ3KSm41JvUQ0hZ/c04iGDg/xWf\n+pp58nfPAYwuerruPNWmlStWAXf0UTqRtg4hQDWBuUFDJTuWuuBvEXudz74eh/wK\nsMwfu1HFvjy5Z0iMDU8PUDepjVolOCue9ashlS4EB5IECdSR2TItnAIiIwimx839\nLdUdRudafMu5T5Xma182OC0/u/xRlEm+tvKGGmfFcN0piqVl8OrSPBgIlb+1IKJE\nm/XriWr/Cq4h/JfB7NTsezVslgkBaoU=\n-----END CERTIFICATE-----\nNow you can go on and build the POST request!
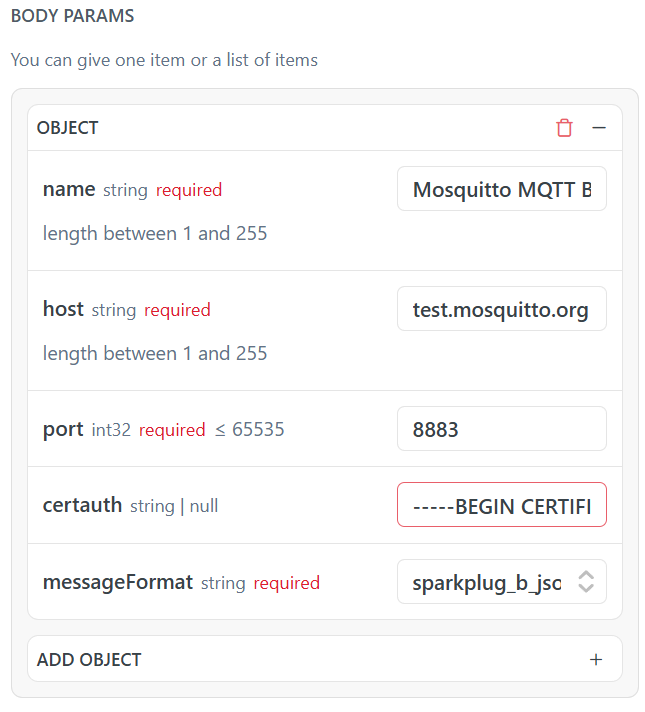
Step 3: create the MQTT broker
To build the request body, you will first need to copy the contents of the converted .txt certificate file that you obtained in the last step. Once you have that, you can populate the request body of MqttBrokerList's POST Request. As you can see, we will select sparkplug_b_json as a messageFormat:
curl --location 'https://portal.ixon.cloud/api/mqtt-brokers' \
--header 'Api-Application: $applicationId' \
--header 'Api-Company: $companyId' \
--header 'Api-Version: 2' \
--header 'Authorization: Bearer $bearerToken' \
--data '[
  {
    "messageFormat": "sparkplug_b_json",
    "name": "Mosquitto MQTT Broker",
    "host": "test.mosquitto.org",
    "port": 8883,
    "certauth": "-----BEGIN CERTIFICATE-----\n ... certificate data ... \n-----END CERTIFICATE-----"
  }
]'
{
"type": "CreateResponse",
"data": [
{
"publicId": "$newBrokerPublicId"
}
],
"moreAfter": null,
"status": "success"
}
Please noteIf you choose to test this call through the endpoint documentation page using the converted certificate, it is possible that you will see a validation error in the
certauthfield, even if it is actually correct:This is likely due to the ReadMe form misunderstanding the pattern. Therefore, we recommend running the cURL command in Postman.
How to create a client for your broker
Goal: create a new client for your broker.
What you will need:
- The
nameof the client.
In just a single step, you can create a POST Request to the MqttBrokerClientList endpoint. In this example, we will not need any certificates and keys, or username and password:
curl --location 'https://portal.ixon.cloud/api/mqtt-brokers/$brokerId/clients' \
--header 'Api-Application: $applicationId' \
--header 'Api-Company: $companyId' \
--header 'Api-Version: 2' \
--header 'Authorization: Bearer $bearerToken' \
--data '
[
  {
    "name": "Mosquitto client"
  }
]
'
{
"type": "CreateResponse",
"data": [
{
"publicId": "$newClientPublicId"
}
],
"moreAfter": null,
"status": "success"
}How to test your broker's configuration on the IXON Portal
Goal: send a message to a broker's topic via the client to test if the connection in the IXON Portal works.
What you will need:
- The
brokerIdof the broker you want to test; - The
clientIdof the broker's client; - A
topicof choice; - A
messageto send!
Step 1: get the IDs of the broker and its client
As a first step, you will need to send a GET Request to MqttBrokerList to get the publicId of both the broker and the client you want to use. You can get both via this single API call, as well as other useful data, using the following query params:
curl --location 'https://portal.ixon.cloud/api/mqtt-brokers?fields=*,clients.name,clients.username,clients.password,clients.clientCert,messageFormat' \
--header 'Api-Application: $applicationId' \
--header 'Api-Company: $companyId' \
--header 'Api-Version: 2' \
--header 'Authorization: Bearer $bearerToken'
{
"type": "MqttBroker",
"data": [
{
"publicId": "$brokerId",
"name": "test.mosquitto.org",
"host": "test.mosquitto.org",
"port": 8883,
"certauth": "-----BEGIN CERTIFICATE-----\n ... certificate data ... \n-----END CERTIFICATE-----",
"clients": [
{
"publicId": "$clientId",
"name": "test.mosquitto.org",
"username": null,
"password": null,
"clientCert": null
}
],
"messageFormat": "sparkplug_b_json"
}
],
"moreAfter": null,
"status": "success"
}In our example case, the client does not need authentication or certificates, making these fields null.
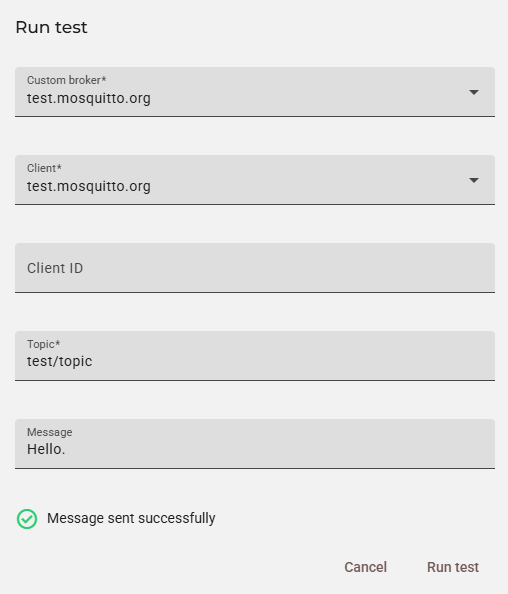
Step 2: post a test message to a topic
To simulate the Run test window found on the top right in Admin > MQTT > Brokers, we can use MqttBrokerClientMessage's POST Request. This way we will be able to see if our client is sending messages correctly:
curl --location 'https://portal.ixon.cloud/api/mqtt-brokers/$brokerId/clients/$clientPublicId/message' \
--header 'Api-Application: $applicationId' \
--header 'Api-Company: $companyId' \
--header 'Api-Version: 2' \
--header 'Authorization: Bearer $bearerToken' \
--data '{
  "topic": "test/topic",
  "message": "Hello."
}
'
{
"type": "Null",
"data": null,
"status": "success"
}Our API call would look like this on the Portal's interface:
Optional: use a WSL terminal to read messages
Alternatively or additionally, you can start a WSL terminal and subscribe to a topic to see if the connection works. Needless to say, we will use test/topic once again like in we did in previous examples. Navigate to the folder containing the certificate and run the following command:
mosquitto_sub -h test.mosquitto.org -p 8883 -t "test/topic" -v --cafile mosquitto.org.crtLeave the terminal open and send another POST request like you did in Step 2. You should see your Hello. message in the terminal:

Tips for error messages
- If you receive a
timeout errornext to a red cross symbol a few seconds after sending a message, it is possible that the certificate(s) you are using in the configuration is/are not correct for that broker/client. In this case, it is useful to troubleshoot which certificate(s) is/are needed for them. Remember that it/they can change based on the port you have chosen as well;- Keep in mind that only Historical Data is sent to your broker;
- For more troubleshooting suggestions, check the Troubleshooting section found in this support article.
How to test topic isolation between devices
Goal: make it so that two distinct devices, each subscribing to its own, unique MQTT topic, will only receive messages published specifically to that topic, ensuring that their data streams are completely isolated from one another.
What you will need:
- The
brokerIdof the broker you want to test; - The
clientIdof the broker's client(s); - Specific
topic(s)for each device; - A
messageto send!
This procedure outlines the steps to confirm that two different devices, subscribed to unique MQTT topics, only receive messages intended for them. You'll need two separate terminal windows to perform this test.
Step 1: start the subscriber for Device 1
First, set up a listener for the first device. As an example, we will assume that its ID will be nDkDhuiGWLVE. This client will subscribe to test/topic/nDkDhuiGWLVE by using the the -t flag and should only receive messages published to that specific topic. The -i flag sets the Client ID of the client that is publishing (sending) the message.
Open your first WSL terminal window (this example uses Ubuntu 24.04) and run the following command to start the first subscriber:
mosquitto_sub -h test.mosquitto.org -p 8883 -t "test/topic/nDkDhuiGWLVE" -v --cafile "C:\Users\YourUsername\Documents\certs\mosquitto.org.crt" -i "nDkDhuiGWLVE"This terminal is now actively listening for messages on Device 1's channel.
Step 2: start the subscriber for Device 2
Now we will do the same thing for Device 2. Assuming that its ID will be aZ0R3tJG0Z96, this client will subscribe to test/topic/aZ0R3tJG0Z96 and should only receive messages published to that specific topic.
Open a second WSL terminal window and run the following command to start the second subscriber:
mosquitto_sub -h test.mosquitto.org -p 8883 -t "test/topic/aZ0R3tJG0Z96" -v --cafile "C:\Users\YourUsername\Documents\certs\mosquitto.org.crt" -i "aZ0R3tJG0Z96"This second terminal is now listening for messages specifically for Device 2.
Note about--cafileIt is also possible to navigate directly to the folder where your broker certificate is saved and then run
--cafile mosquitto.org.crtonly instead of including the full path.
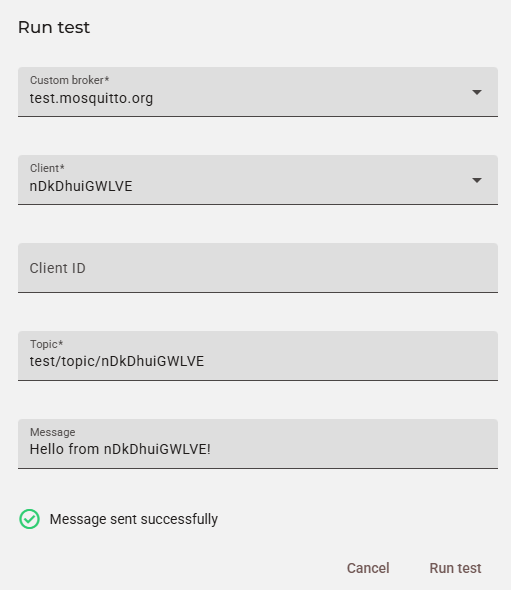
Step 3: publish a message to Device 1
Finally, send a test message to Device 1's topic to confirm its isolation using MqttBrokerClientMessage's POST Request. If you do not yet possess the IDs of your broker and its client(s), please refer to this previous section's Step 1 to get them:
curl --location 'https://portal.ixon.cloud/api/mqtt-brokers/$brokerId/clients/$clientPublicId/message' \
--header 'Api-Application: $applicationId' \
--header 'Api-Company: $companyId' \
--header 'Api-Version: 2' \
--header 'Authorization: Bearer $bearerToken' \
--data '{
    "topic": "test/topic/nDkDhuiGWLVE",
    "message": "Hello from nDkDhuiGWLVE!"
}'
{
"type": "Null",
"data": null,
"status": "success"
}As seen you can see in this screenshot, the message is routed only to Device 1's specific topic:

Step 4: publish a message to Device 2
Now, we can send a similar test message to Device 2's topic using the same endpoint as the previous step:
curl --location 'https://portal.ixon.cloud/api/mqtt-brokers/$brokerId/clients/$clientPublicId/message' \
--header 'Api-Application: $applicationId' \
--header 'Api-Company: $companyId' \
--header 'Api-Version: 2' \
--header 'Authorization: Bearer $bearerToken' \
--data '{
    "topic": "test/topic/aZ0R3tJG0Z96",
    "message": "Hello from aZ0R3tJG0Z96!"
}'
{
"type": "Null",
"data": null,
"status": "success"
}At this point, the message to Device 2 has been sent only to its own topic:

If we wanted to visualize or run these tests in the Portal, this is what we would see for Device 1:
Note about the Client ID field on the PortalIn the example above, the Client ID field is empty because we are using
-i "nDkDhuiGWLVE"and-i "aZ0R3tJG0Z96"in the subscription command in our terminals. If we filled that field with thepublicIdof the devices as well as keep the-iflags in the subscription commands, we will get a "Message successfully sent" pop up, but we won't see anything in the terminal. Running the commands without the-iflags will allow you to fill in the Client ID field, as well as leave it empty, and still see the message in the terminal.mosquitto_sub -h test.mosquitto.org -p 8883 -t "test/topic/nDkDhuiGWLVE" -v --cafile "C:\Users\YourUsername\Documents\certs\mosquitto.org.crt"mosquitto_sub -h test.mosquitto.org -p 8883 -t "test/topic/aZ0R3tJG0Z96" -v --cafile "C:\Users\YourUsername\Documents\certs\mosquitto.org.crt"
Updated 3 months ago