IXON API Authentication Headers
This page describes how to authenticate to the IXON API via bearer tokens.
Required modulesApi Service Accounts are included in the API Integrations module.
The Application ID and the bearer token are among the most essential API headers needed to use the IXON API. Take a look at the next sections to know more about them.
How to get an Application ID
All endpoints can solely be reached when a valid Application ID is provided.
There are two types of Application IDs, to be used accordingly depending on the situation:
- API Service Accounts Application ID: This Application ID will appear during the creation of a new Service Account in the IXON Portal. In this case, the bearer token saved by the user will only work if used together with the ApplicationID of that specific Service Account.
- Regular Application ID: If a user needs to generate a bearer token manually, they will need to contact their Sales Representative to be provided with a dedicated Application ID.
To learn more, refer to the following sections.
How to get a bearer token
Most endpoints require authentication. By using bearer tokens, your requests will be processed more quickly and safely compared to storing your password.
There are two ways to get a bearer token:
- (Recommended) Using API Service Accounts.
- Generating one manually using the AccessTokenList endpoint. Note: This method is only advised in specific situations.
API Service Accounts
API Service Accounts consist of non-personal "accounts" which allow external IT applications to communicate securely with the IXON Cloud API via a permanent bearer token. These tokens are not tied to an email address or a physical person.
Generating a bearer token with API Service Accounts solves the problem of integrations breaking down when users leave the company, change their password or get another role.
For this reason, API Service Accounts are the recommended best practice to generate a bearer token.
Characteristics of API Service Accounts
There are a few things to keep in mind about API Service Accounts:
- No email, password or 2FA needed: Since these tokens are not tied to any personal login credentials, there is no need to provide any. This also decreases the security risks associated with the use of credentials.
- Unlimited Creation: A company can have an unlimited amount of Service Account. It is recommended to create one for each individual integration (e.g., one for an ERP system, one for a ticketing system...).
- Configurable Role: Service Accounts are by default created with an Administrator Role, but access can be restricted by assigning more limited roles.
- Business Continuity: If the user who originally created the Service Account is deleted or leaves the company, the Service Account remains active. The integrations will continue to run without interruption.
- No expiration: Unlike manually generated bearer tokens, Service Accounts bearer tokens do not expire.
- Service Accounts for end customers: Machine builders can create a Service Account on a customer or device level and make it available to the end customer, who will be able to build custom integrations with access exclusively to their own machine.
Limitations of API Service Accounts
API Service Accounts also possess limitations:
-
API Limitations: Certain endpoints are not supported for Service Accounts.
-
Access Requests cannot be approved/rejected.
-
Requests for connections protected by Access Request are automatically denied.
-
Message Center filters cannot be configured to forward to e-mails.
-
Companies cannot be created with a Service Account.
-
Certain MyUser related endpoints cannot be used with Service Accounts:
- MyUserEmailAddressChangeList
- MyUserOtpAuthEnable
- MyUserOtpAuthSmsEnable
- MyUserPassword
-
Scheduled Reports related endpoints cannot be used with Service Accounts:
- QueueReportList
-
-
No Web or App Access: Service Accounts cannot be used to log into the IXON Cloud web interface or the mobile app. Note: If your use case involves implementing a login workflow, refer to the Manual bearer token generation section found in this article.
-
Rate Limits: Service Accounts have the same rate-limiting thresholds as standard human user accounts.
-
No Email-Based Features: Since these accounts lack an email address, features like Scheduled Reports or Email Notifications will not work for them.
How to create a Service Account
Service Accounts can only be created in the Admin view. To create one, follow these steps:
-
Navigate to Admin > Integrations > Service Accounts, click the Create Service Account button and add the name of the integration.
-
An interface will pop up and show the API Application ID related to the Service Account—which the developer will need to use in API calls alongside the Access Token (bearer token). Keep in mind that the token must be stored safely immediately, as it will not appear again. It can be seen and saved ONCE and only ONCE.
Some pre-written examples containing the new bearer token will also appear.
-
Optionally, the user can click on the name of the Service Account and navigate to the User view, where Roles, Devices and Managed Users can be managed.
-
After creating the Service Account and saving the Bearer Token, you can use it alongside its respective ApplicationID to work on your integrations!
Manual bearer token generation
Please noteIn case you are generating bearer tokens manually, you need to request an Application ID to pair them with. You can do so by contacting your Sales representative.
If your use case involves an integration with user accounts (e.g. a full custom frontend), Service Accounts bearer tokens will not work.
Instead, you will have to generate it by integrating an API call to the AccessTokenList endpoint in your workflow.
We recommend to use Postman or another similar tool for the following steps.
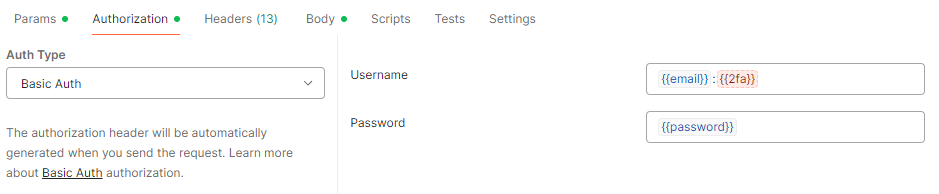
Step 1 - Get Basic Authorization
To set up the Authorization section of this call, select Basic Auth as Auth Type and then add {{email}}:{{2fa}} in the Username section and {{password}} in the Password section. You can fill these environmental variables with the respective values by hovering over them.
Please note: the {{2fa}} field isn't needed unless you are using Two-Factor Authentication (the field will be highlighted in red), in which case you will have to recover a valid code, set it up in its field and then send the request before its expiration. You should therefore leave it empty.
Here is an example of what the section should look like:
Alternative: Get Basic Authorization via Shell
As we mentioned before, an example of a case scenario in which you want to use the API would be automatizing a process with custom code, for example using a Shell script. This process would require the generation of a bearer token, and therefore also of Basic Authorization.
To set up Basic Auth in a Shell script you need to manually generate a cipher of your credentials. Before encrypting, this string consists of your email address and your IXON Cloud password, so the value to encrypt would be $yourEmailAddress::$yourPassword.
$(echo -n '[email protected]::Password1' | base64)Note that if you make use of Two-Factor authentication you need to include the One Time Password (OTP) as well. The string needs to be BASE64 encoded in the request and uses the format: $yourEmailAddress:$yourOtp:$yourPassword (check the note below for additional information).
Tip:We do not recommend using this method if you use Two-Factor Authentication. If you are not fast enough, the OTP might expire before you can successfully use it to get the encrypted string, copy it into the cURL command and get a successful request. If you are not building a script, it is easier to use a tool like Postman and set up environment variables instead. On the contrary, if you are building a script, we suggest creating a user created specifically to call the API without any enforced 2FA.
Step 2 - Set an expiration time and get the secretId field
secretId fieldBecause a bearer token is temporary you also have to include ‘expiresIn’ data in seconds. You can choose an expiration time between 60 seconds and 60 days (5.184.000 seconds).
In the request, you have to include the field 'secretId' in the URL: this is the value of the bearer token, which you will be using whenever required. This value will be composed of 32 characters in total, among which you can find capital letters, lower case letters and numbers. The examples below contain a request for a bearer token and its response using the AccessTokenList endpoint.
curl --request POST \
     --url 'USER.URL/api/access-tokens?fields=secretId' \
     --header 'Api-Version: 2' \
     --header "Api-Application: $applicationId" \
     --header 'Content-Type: application/json' \
     --header "Authorization: Basic $base64_cipher_of_credentials" \
     --data '{"expiresIn": 3600}'
{
"status": "success",
"type": "AccessTokenCreateResponse",
"data": {
"publicId": "$responsePublicId",
"expiresOn": "2021-02-02T00:59:59Z",
"secretId": "$bearerToken",
"user": {
"publicId": "$userPublicId",
"name": "$username",
"emailAddress": "$userEmailAddress",
"support": false,
"language": "en",
"localisation": null,
"timeZone": null,
"registeredOn": "2020-09-01T10:59:29Z",
"lastSeenOn": "2020-12-02T07:38:31Z",
"termsOfUsePolicyAcceptedOn": "2020-09-01T10:59:29Z"
}
}
}Step 3 - Use a bearer token with its correct syntax
The syntax of the bearer token might be source of confusion, which will be cleared up in this section.
Important premiseIt is nearly always assumed that the correct syntax would be a concatenation of the following:
Bearer+bearer_value(secretId) . In the following use example,Beareralready specifies for us that the Auth Type is of "Bearer" type, therefore all you have to do next is to insert the actual value of the previously recoveredsecretId. You will need to addBearerwhen it is not specified anywhere else, like inside the body of the cURL request below:--header 'authorization: Bearer A9dP3vXzR7qLmF2HsTkW0jCeUyNb8GoV.
If you want to make an API call from our endpoint list section you will need to fill in the Credentials section on the right by adding the value of the secretId that you generated with the AccessTokenList call. If the value of the secretId is Abc93vXzR7qLmF2HsTkW0jCeUyNb8GoV, then you will only insert this part in the box below. See AgentDataSource to follow this example.

Using a bearer token through environmental variables in Postman
In case you want to use Postman without importing a cURL command, or in case you want to manually modify the settings of an API call, you can set up an environmental variable and assign your bearer token to it. After that, go to the Authorization section, select "Bearer Token" as Auth Type on the left, and once you will type the name of the variable between mustache tags as shown below, you should see the following by hovering over it:

As you can see, the "Bearer" type is being pre-declared by Postman, and all you need to add is the value.
NoteKeep in mind that on Postman, if you declare the bearer token in the Authorization section, you won't need to declare it in the Headers section.
Updated 3 months ago