Calling a Cloud Function from a UI Component
This article will guide you through the steps needed to create a basic Cloud Function as well as a UI Component used to visualize its response.
In this page, we’ll talk about the basics of how to create a simple UI Component that can call a Cloud Function and test them together in the simulator of the Component SDK.
For a more detailed description of UI Components, please refer to the UI Components documentation.
What you need
In addition to the requirements and results from the first tutorial, this next tutorial also requires:
- Node.js 18 or newer
- (Optional) Git: you will need it in case you want to use the
degitcommand to generate the UI Component.
Part 1 - Project set up
Before you start, remember to check the Prerequisites for development on Microsoft Windows systems if you are a Microsoft Windows user. It will guide you through the current and easiest ways to develop, test and run Cloud Functions.
Step 1 - Create the Backend Component environment
First, we will need to create the backend environment of the project, which will contain the functions of our Cloud Function (which we can preferably call Cloud App). To set up this environment, this is what you will need to do:
Step 1.1 - Create the root project folder
Follow the steps shown in the Initial set up section of the "Running a Cloud Function" article. You can skip the parts regarding the CDK Ingress, as you will not need them for this guide: we will instead call the greet function via a button in the component.
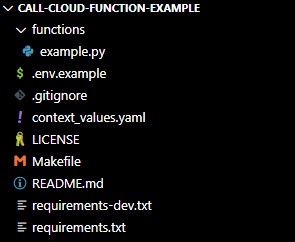
Once the root folder has been created, you will obtain a folder that looks similar to this:
After finishing the set up and having installed the dependencies, you can move on to the next section.
Do not change the name of thefunctionsfolder!The IXON CDK Ingress is exposed on the
./functionsmodule by default. If you change the name of the folder and usemake run, you will receive aNo such file or directoryerror instead. For this reason, make sure to keep the default folder name! Additionally, if you want to use a different name for a file other than the defaultexample.py, remember to create an__init__.pyempty file in the same folder as per Python's best practices.
Step 2 - Create the UI Component environment
As a second step, we need to create a UI component environment, which will consist of the frontend part of our project and will help us visualize what a Cloud Function returns.
Step 2.1 - Install more CDK dependencies for frontend development
For this guide, we will install the dependencies needed to set up a UI Component environment without cloning IXON's ui-components repository. The following command will enable you to run all the cdk commands which will in turn install the required packages like templates, simulator or specific builders:
npm i -D @ixon-cdk/core@latest @ixon-cdk/runner@latestStep 2.2 - Generate the UI Component
Navigate to the /components folder of your project and run the command below to pick a template and then a variant. In this example we will pick Svelte and JavaScript + CSS.
npm run generate your-ui-component
UI Component generation alternativeYou can run follow the instructions below and run the following commands to clone, install and start simulating the UI component. As stated in the previous section, you will need Git installed on your computer to make the
degitcommand work.# Navigate to your root project folder. cd call-cloud-function-example # Clone the contents of the frontend component repository without its history in the project root folder. npx degit ixoncloud/component-workspace # Install the dependencies. npm install # Navigate to the "components" folder. cd components # Generate and simulate your new component in one command. npx cdk generate your-ui-component
Part 2 - Building a simple UI component
Now you can finally start to work on the visualization of the component.
Step 1 - Create a button to call the Cloud Function
Open /components/visualization-component/visualization-component.svelte and completely replace the code with the following.
<script>
  import { onMount } from 'svelte';

  export let context;
  export let client;
  export let result;

  onMount(() => {
    client = context.createBackendComponentClient();
  });

  async function onClick() {
    const response = await client.call(
      'functions.example.greet',
      {'parameter': 'Developer'});
    result = JSON.stringify(response, null, 2);
  }
</script>

<main>
  <form>
    <button on:click={onClick} type="button">
      Call Cloud Function!
    </button><br />
    <textarea bind:value={result}
              rows="10" cols="80"></textarea>
  </form>
</main>
Step 2 - Test the function
You will need to run two different terminals for this test: one for the Cloud Function, and one for the UI Component.
Step 2.1 - Simulate the Cloud Function (backend)
First, open a new WSL/Bash terminal in your editor and run the following command to start simulating the Cloud Function environment:
make runYou should see something similar to this in the terminal:
CBC_PATH=./functions ./venv/bin/python3 -m ixoncdkingress
2025-10-13 14:02:32,684 - ixoncdkingress - INFO - Starting DocumentDB server
2025-10-13 14:02:36,808 - ixoncdkingress - INFO - DocumentDB server started successfully
2025-10-13 14:02:36,810 - ixoncdkingress - INFO - wsgiref listening on http://127.0.0.1:8020/
2025-10-13 14:02:36,810 - ixoncdkingress - INFO - CBC_PATH: ./functions
Step 2.2 - Simulate the UI Component (frontend)
Now you can simulate the UI component with the following command:
$ npx cdk simulate visualization-componentOnce the simulator has started, make sure to check in Settings > Component that the Local Cloud Function Ingress is being used. Without it, you will not be able to test your local function:

Click on the Call Cloud Function! button. This is what the component and its response will look like:
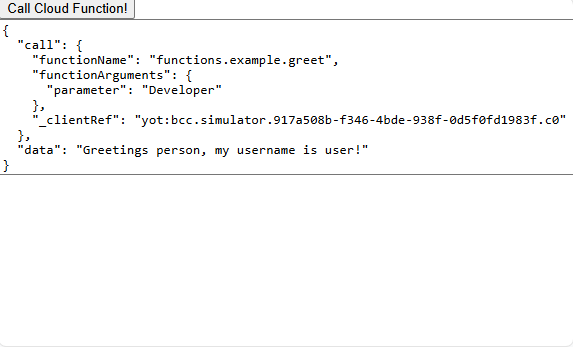
A very simple and rudimentary UI component.
In the terminal where you run ixoncdkingress, you’ll see an HTTP log entry of the call. Every call will print the contents of the context_values.yaml file:
127.0.0.1 - - [13/Oct/2025 14:03:31] "POST / HTTP/1.1" 200 40
2025-10-13 14:03:32,098 - ixoncdkingress - INFO - Loading context values from ./context_values.yaml
2025-10-13 14:03:32,100 - ixoncdkingress - INFO - context values: {'serviceAccount': {'username': 'user', 'password': 'pass'}}
You have now successfully called a Cloud Function from a UI Component in the simulation environment!
More tutorials or use cases
You can check out more examples using Cloud Functions in the IXON SDK Cloud Functions Tutorials section.
Updated 4 months ago