How to run the default "Example" Cloud Function
This article will guide you through the basic steps needed to start and run a Cloud Function, and also to test it via the IXON CDK Ingress.
This page provides basic information and knowledge about Cloud Functions by showing how to run the sample Cloud Function found in the SDK and how to test it in isolation via the IXON CDK Ingress.
A basic understanding of Python is assumed.
What you need
- Linux, macOS or Windows with WSL2 (if you haven't done so yet, follow the steps in Prerequisites for development on Microsoft Windows Systems.
- Python 3.x, which can be downloaded from https://www.python.org/. Choose one of the following based on which
ixoncdkingressversion you are using:- Python 3.10 or higher if you are using
ixoncdkingress v0.x.x. - Python 3.12 or higher if you are using
ixoncdkingress v1.x.x. Best practices include using updated version of the ixoncdkingress, therefore this option is recommended. For more information, check the Updating the Cloud Function workspace article.
- Python 3.10 or higher if you are using
Note:If you are using WSL on Windows, make sure to install Python3 on it. You can find out how to do so in the Installing Python3 in WSL section.
- Docker – can be downloaded from the official page.
- Code editor – it is recommended to use one that understands Python, such as Visual Studio Code or JetBrains PyCharm Community. The guides on the IXON Website are based on VS Code.
Initial set up
We’ll start by setting up a development environment for your new project.
Do not edit the Makefile!Please do not make any changes to the Makefile as it is not intended to be changed.
-
Download the workspace from Github as a ZIP file and extract it. Please note: do NOT clone the workspace, as it could cause Git-related issues!
-
Navigate to the
backend-component-workspacedirectory in your File Explorer. -
(Optional during this set up) Create the
.accesstokenfile and add an access token (do this if you are building separately from a UI Component; if you build a UI Component instead, thenpx cdk logincommand will already do that for you):- To get an access token, create it by following Request a bearer token (Requires API Integration license).
-
Run the command
make run. If this command returns an error message concerning installable modules, follow the steps below in the Steps to install the right .venv:
$ make run# Update your package list
sudo apt update
# Install the required .venv package
sudo apt install python3.12-venv
# Clean up the old, failed attempt by removing the broken venv directory
rm -rf venv
# Run the original command again
make run
Important note: do NOT skip this one!If you are a Windows user:
- Make sure to run all commands in the WSL terminal opened on VS Code (or other editors) to avoid blocking issues.
- Remember that
make runwill not work unless you open your folder in WSL. Before testing your Cloud Function, make sure to do so by following the Using WSL via VS Code Remote and accessing Windows folders section.For any users:
- When using
make runto install any additional dependencies or to just start simulating again, remember to position yourself in the(venv)folder like in the image below. You can do so by running thesource venv/bin/activatecommand:

-
To see the IXON CDK Ingress, open your browser and go to the IXON CDK Ingress page. It should look like the image below.
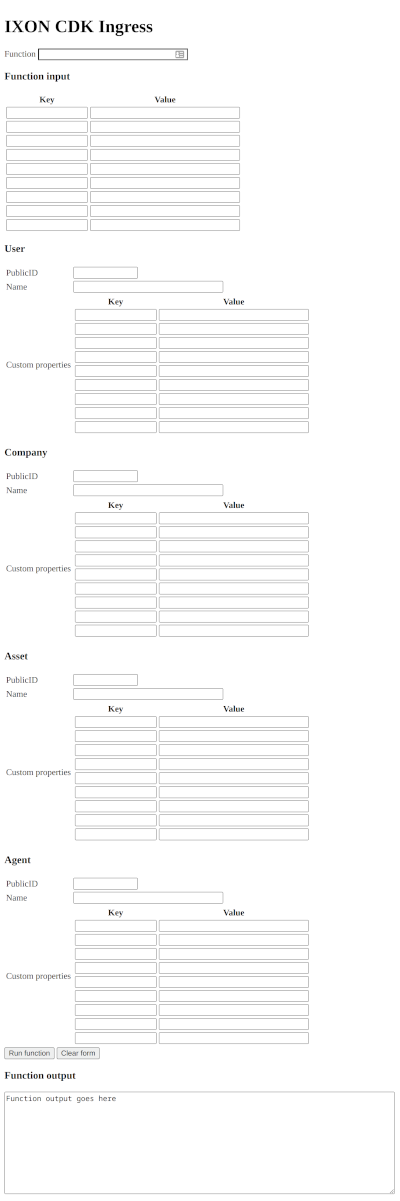
How to run a function
Let’s test out a function that lets us greet either a person or someone else specifically, if we want.
With ixoncdkingress v0.0.21, it is now possible to use the context_values.yaml file to set up fields that we will be able to access directly from the FunctionContext.
NoteDo keep in mind that this file is only useful for storing sensitive data during local development, and not when a Cloud Function is running on the IXON Portal. For more information about this, please check the configuration article.
Follow these steps to test the workspace's basic Cloud Function:
- In the
context_values.yaml, change the values ofusernameandpassword, which are underserviceAccount. - In the
functionsdirectory, you will find a file calledexample.py. Open it in your editor. - This is what you will see:
from ixoncdkingress.function.context import FunctionContext

@FunctionContext.expose
def greet(context: FunctionContext, name: str = 'person'):
    """
    A simple example function that greets someone.
    """
return f'Greetings {name}, my username is {context.config["serviceAccount"]["username"]}!'-
Restart the test environment by running
make runagain. -
Go back to the IXON CDK Ingress page.
-
Python calls its functions based on the file path, file name and function name, in this exact order and separated by a full stop
.: based on this, enterfunctions.example.greetin theFunctionfield and click theRun functionbutton, located beforeFunction output.Enter
functions.example.greetin theFunctionsfield and clickRun function.
You should see the following result, with User 1 replaced by the value you assigned to username in the context_values.yaml. The value person is the default one assigned as a parameter to {name} by default in the code:
"Greetings person, my username is User 1!"Change the function
Now let’s try to greet someone else.
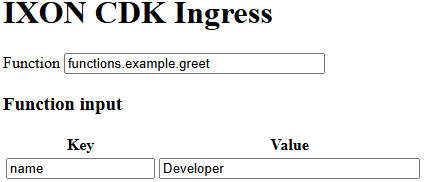
- In the first row of the table below
Function inputenternameunderKeyandDeveloperunderValue:
-
Run the function again and take a look at the output:
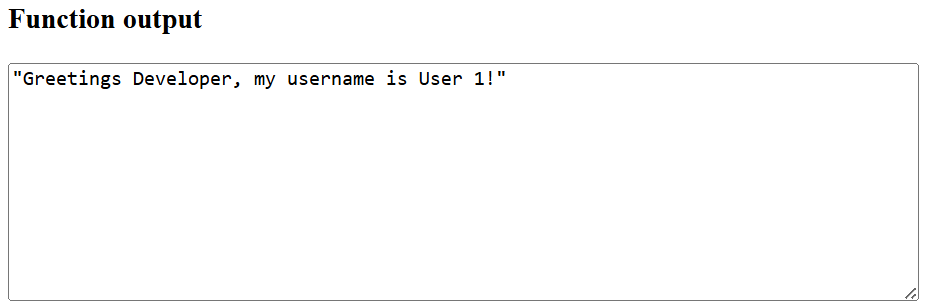
It now says Greetings Developer! instead! We now have all the basic ingredients for a Cloud Function.
Things to try out from here
Try saying Hello to others. See what happens if you change the Key to a different value, and how you can make the Cloud Function work with that other value.
Updated 29 days ago