How to retrieve historical data from your own InfluxDB
In this article, we will show an example of a Python application able to query the database directly with only a few API calls.
Differences between DataList database access and direct InfluxDB access
Datalist database access can be used for basic querying and for charting low or moderate data volumes by using IXON's post-aggregators.
Direct InfluxDB access allows for more advanced querying and performance: you can set up different post-aggregators and get data from multiple devices simultaneously.Based on your needs, please refer to either this tutorial or the DataList database access tutorial.
Required modules
You will need the API Integration and Data Studio modules. Check your modules at Admin > Licenses. To obtain these modules and your database credentials, contact your IXON account manager or IXON distributor.
Direct InfluxDB access: use cases and needs
Eventually, you might have more specific needs concerning your historical data, such as:
- The need to extract historical data using an advanced query;
- The need to set up and use other preferred post-aggregators, or advanced Native Flux/InfluxQL analytics tools;
- The need to extract data from multiple devices and process it based on your needs;
- The need to perform the retrieval of high volumes of data.
If this is what you need, this tutorial will guide you through the steps to build a project that will allow the querying of your InfluxDB database directly through pure Python code. Complete and working code snippets will be provided along the way.
Before you start
To create your project, this is what you will be need:
- Python 3.13 or higher – can be downloaded from the official website. This tutorial uses Python 3.14.3;
- A code editor – it is recommended to use one that understands Python, such as Microsoft Visual Studio Code or JetBrains PyCharm Community. This tutorial uses Visual Studio Code;
- A basic understanding of Python.
Note: dependencies and virtual environment
For this example, the creation of a virtual environment was not needed since the required packages were installed on the global Python interpreter, later selected in the code editor.
If you wish to, it is also possible to create an isolated virtual environment within the project and install the required packages there: in this case, you will need a requirements.txt file in the project folder containing the imports and their versions.
Once you are all ready and set, you can start following this tutorial!
Step 1 - Create the client_builder.py file
The first thing to do consists of creating an instance of the InfluxDBClient object containing the correct data to access the database: we will need it further in this tutorial. To do this with Python, you will need to create a file containing the query_influxdb function, where the client's instance and the correct fields and their values will be stored.
Here are the steps to do so:
-
By importing the InfluxDBClient, you will be able to build a custom client and assign your query to it:Import the InfluxDBClient
from influxdb import InfluxDBClient -
The function's input parameter will be the query's string value. In this example, it also contains the following fields and their values:Create the query_influxdb functionhost(string);port(int);username(string);password(string);database(string);ssl(bool): ifTrue, the client will connect usinghttps://and ifFalseit will usehttp://. In this specific example, it will be set toTrue;verify_ssl(bool): ifTruethe client will check that the server’s SSL certificate is valid and trusted, ifFalsethen the client will not verify the SSL certificate. In this example case we will set it toFalse.
Everything should look similar to this:
def query_influxdb(query):
    host = "www.example.com"
    port = 12345
    username = "example-user1"
    password = "example-password1"
    database = "example-domain-name"
    ssl = True
    verify_ssl = False
Note about protecting credentials
Your credentials (secrets) can be stored by using sturdier tools for encryption and protection. You can choose whatever suits your needs best.
-
After the values are set, we will create a new instance of InfluxDBClient and assign the aforementioned fields respectively:Create the client's constructor
client = InfluxDBClient(
        host,
        port,
        username,
        password,
        database,
        ssl,
        verify_ssl
    )
-
Finally, return your query's result as a string:Return the query's result
    result = client.query(query)
    return result
In the end, the complete file should look like this:
from influxdb import InfluxDBClient

def query_influxdb(query):

    host = "www.example.com"
    port = 12345
    username = "example-user1"
    password = "example-password1"
    database = "example-domain-name"
    ssl = True
    verify_ssl = False

    client = InfluxDBClient(
        host,
        port,
        username,
        password,
        database,
        ssl,
        verify_ssl
    )

    result = client.query(query)
    return result
Step 2 - Create the .env file
To make sure that the data you need for the API calls is safely stored and available throughout the whole project, we will declare some constant variables in a .env file. This way, all the sensitive data will be stored in a secure manner. Here are their values and how to get them:
API_VERSION(string): the default value is "2";API_APPLICATION_ID(string): your personal applicationId. If you do not have one yet, refer to this documentation section;AUTHORIZATION(string): your bearer token. To get one, refer to this documentation section. Keep in mind that this string must have the word "Bearer" at the beginning: "Bearer$generated_bearer_token1";COMPANY_ID(string): your companyId. Refer to this documentation section to get it;AGENT_ID(string): the chosen agentId. Refer to this documentation section to get it;DATA_SOURCE_ID(string): the chosen dataSourceId. Refer to this documentation section (Data sources subsection) to get it. Note that this variable is optional, check this paragraph for further details;TAG_IDENTIFIER(string): the slug of the tag. Refer to this documentation section (Tags subsection) to get it. This example uses aslugvalue, but alternatively it is possible to use atagIdif you prefer.
Please note: in this project, these values are hard-coded for a simpler demonstration, but you are of course free to apply different kinds of data manipulation to the code and make it dynamic instead.
Your .env file should look roughly like this:
API_VERSION = "2"
API_APPLICATION_ID = "$yourApplicationId"
AUTHORIZATION = "Bearer $yourBearerToken"
COMPANY_ID = "$yourCompanyId"
AGENT_ID = "$yourAgentId"
DATA_SOURCE_ID = "$yourDataSourceId"
TAG_IDENTIFIER = "$yourTagIdOrSlug"
Now, all that is left to do is replacing the lines preceded by the $ with your values of choice.
Note about tag identification
Do not confuse
tagIdwith the tag'spublicId, as they are two different things:tagIdis used for building queries and communicating with the database, whereas thepublicIdis used for other purposes concerning REST APIs.
If you are following this tutorial and do not want to useslug, then you must usetagId.
Important: atagIdis aninttype of value!
Step 3 - Create the query_api_calls.py file
Now it's time to create the query_api_calls.py file. As stated in its name, it will contain the API calls we need. Their responses will be used to subsequently build the query. Additionally, it contains a function used to format the variable type, tag and retention policy into strings needed in the query's syntax.
-
Import requests , os and dotenv and declare the variables
In this file, you will need to import requests, which we will need to create our API calls, and os alongside dotenv to load our constant variables from the .env file. These packages can be installed either globally in the interpreter or in the virtual environment of the project:
import requests
import os
from dotenv import load_dotenv
After importing what we need, we will load and access the values of our variables by using load_dotenv(), which will allow us to create new variables and assign the correct values to them. Make sure that the variables' names are written the same way as you declared them in the .env file:
load_dotenv() API_VERSION = os.getenv('API_VERSION') API_APPLICATION_ID = os.getenv('API_APPLICATION_ID') AUTHORIZATION = os.getenv('AUTHORIZATION') COMPANY_ID = os.getenv('COMPANY_ID') AGENT_ID = os.getenv('AGENT_ID') DATA_SOURCE_ID = os.getenv('DATA_SOURCE_ID') TAG_IDENTIFIER = os.getenv('TAG_IDENTIFIER') -
Create the get_discovery function
Just as mentioned in this documentation section, the Discovery endpoint is used to get an up-to-date list of all endpoints. Therefore, we will create a dictionary containing the
relandhreffields, which consist of the name (key) and URL of an endpoint (value) respectively:
def get_discovery():

    response = requests.get(
        "https://portal.ixon.cloud/api/",
        headers={
            "Api-Version": API_VERSION,
            "Api-Application": API_APPLICATION_ID,
        },
    )
    if response.status_code != 200:
        raise Exception(
            f"Failed to fetch discovery data. Status code: {response.status_code}"
        )

    return {row["rel"]: row["href"] for row in response.json().get("data", [])}
Discovery: {'AccessRecoverList': 'https://portal.ixon.cloud/api/access-recover', 'AccessTokenList': 'https://portal.ixon.cloud/api/access-tokens', 'AccessToken': 'https://portal.ixon.cloud/api/access-tokens/{publicId}', 'AgentList': 'https://portal.ixon.cloud/api/agents', ...more data...} -
Create the get_data_tag function
In this function we will yet build another request, this time belonging to the AgentDataTagList endpoint. To build the URL, we will use the agent's ID value stored in the .env file. The fields we need to retrieve are
slug,tagId,retentionPolicyandvariable.type. We will need these last two values later in the tutorial.
Please note: thepublicIdof the variable and that of the tag will be returned automatically without being added to the query fields. Additionally, you can add&page-size=4000to be able to return more data tags.In this example, the return data will only be the tag whose
slugvalue equals the global variable that we set up previously:
def get_data_tag():

  discovery_dict = get_discovery()
  url = discovery_dict["AgentDataTagList"].format(agentId=AGENT_ID)
  url += "?fields=slug,retentionPolicy,tagId,variable.type&page-size=4000"

  response = requests.get(
      tags_url,
      headers={
          "Api-Version": API_VERSION,
          "Api-Application": API_APPLICATION_ID,
          "Authorization": AUTHORIZATION,
          "Api-Company": COMPANY_ID,
        },
    )

    if response.status_code != 200:
        raise Exception(
            f"Failed to fetch data tags. Status code: {response.status_code}"
        )
    data = response.json().get("data", [])

    for tag in data:
        if tag["slug"] == TAG_IDENTIFIER:
            return tag
    return None
Tag Data: {'variable': {'publicId': '$variablePublicId', 'type': '$variableType'}, 'publicId': '$tagPublicId', 'tagId': $tagId, 'slug': '$slugValue', 'retentionPolicy': '$retentionPolicyValue'}
Variable Type
The variable type can also be seen in the same section as the identifier and name mentioned in the "Note about slugs" tip in this paragraph.
-
Create the format_tag_id_and_retention_policy function
In this function we will call get_data_tag to retrieve the
retention policyof a tag, thetagIdand thetypeof the variable. These three values together will be formatted in two different strings needed in our query. In the response below, you can see that the variable's type is concatenated with the tag's ID, and the retention policy value is formatted so that it matches with its actual value in the database. An example of an InfluxDB identifier for a tag would beint_35, where int isvariable.typeand 35 istag.tagId:
def format_tag_id_and_retention_policy():

    tag = get_data_tag()
    if tag is None:
        raise ValueError(
            f"No tag found: tag_identifier={TAG_IDENTIFIER}
        )
    retention_policy = tag["retentionPolicy"]
    variable_type = tag.get('variable').get('type')

    return variable_type + "_" + str(tag["tagId"]), "rp_" + retention_policy
format_tag_id_and_retention_policy response: ('$variableType_$tagId', 'rp_$retentionPolicyValue')
Now you finally have all you need to query your database!
Step 4 - Create the query_caller.py file
This will be the final file we will create, where the query will be built and called.
-
Import os, dotenv and the files you've created
First, we must import os, dotenv, client_builder.py and query_api_calls.py, alongside the functions that we need:
import os
from dotenv import load_dotenv
from client_builder import query_influxdb
from query_api_calls import format_tag_id_and_retention_policy
Just like we did in the previous step, we will load and access the values of our variables:
load_dotenv() API_VERSION = os.getenv('API_VERSION') API_APPLICATION_ID = os.getenv('API_APPLICATION_ID') AUTHORIZATION = os.getenv('AUTHORIZATION') COMPANY_ID = os.getenv('COMPANY_ID') AGENT_ID = os.getenv('AGENT_ID') DATA_SOURCE_ID = os.getenv('DATA_SOURCE_ID') TAG_IDENTIFIER = os.getenv('TAG_IDENTIFIER') -
Access the variables and create the build_query function
Here we will build the query based on a given start_time and end_time with the help of the the build_query function, which will return the final result:
def build_query(start_time, end_time):

    tag_id, retention_policy = get_tag_id_and_retention_policy()

    query = """
    SELECT "{}" AS "value", "time"
    FROM "$domain_name"."{}"."data"
    WHERE time >= '{}' AND time <= '{}'
    AND "device"='{}'
    """.format(
        tag_id, retention_policy, start_time, end_time, DATA_SOURCE_ID
    )
    result = query_influxdb(query)
    data_points = list(result.get_points())
    print("Data Points:", data_points)
    return data_points
SELECT "bool_37" AS "value", "time" FROM "ayayot"."rp_260w"."data" WHERE time >= '2024-01-01T00:00:00Z' AND time <= '2024-12-31T23:59:59Z' AND "device"='TuOBZnkxqxtx'Please note: refer to the "query" tab above to check an example of a complete, functioning query.
-
Call the function!
The last thing we need to do now is choosing the start_time and end_time and calling build_query:
if __name__ == "__main__": start_time = "2024-01-01T00:00:00Z" end_time = "2024-12-31T23:59:59Z" build_query(start_time, end_time)Points: [{"time": "2024-01-15T10:57:41.675000Z", "value": $value}, {'time': '2024-01-15T10:57:55.370000Z', 'value': $value}, ... more data points ...]
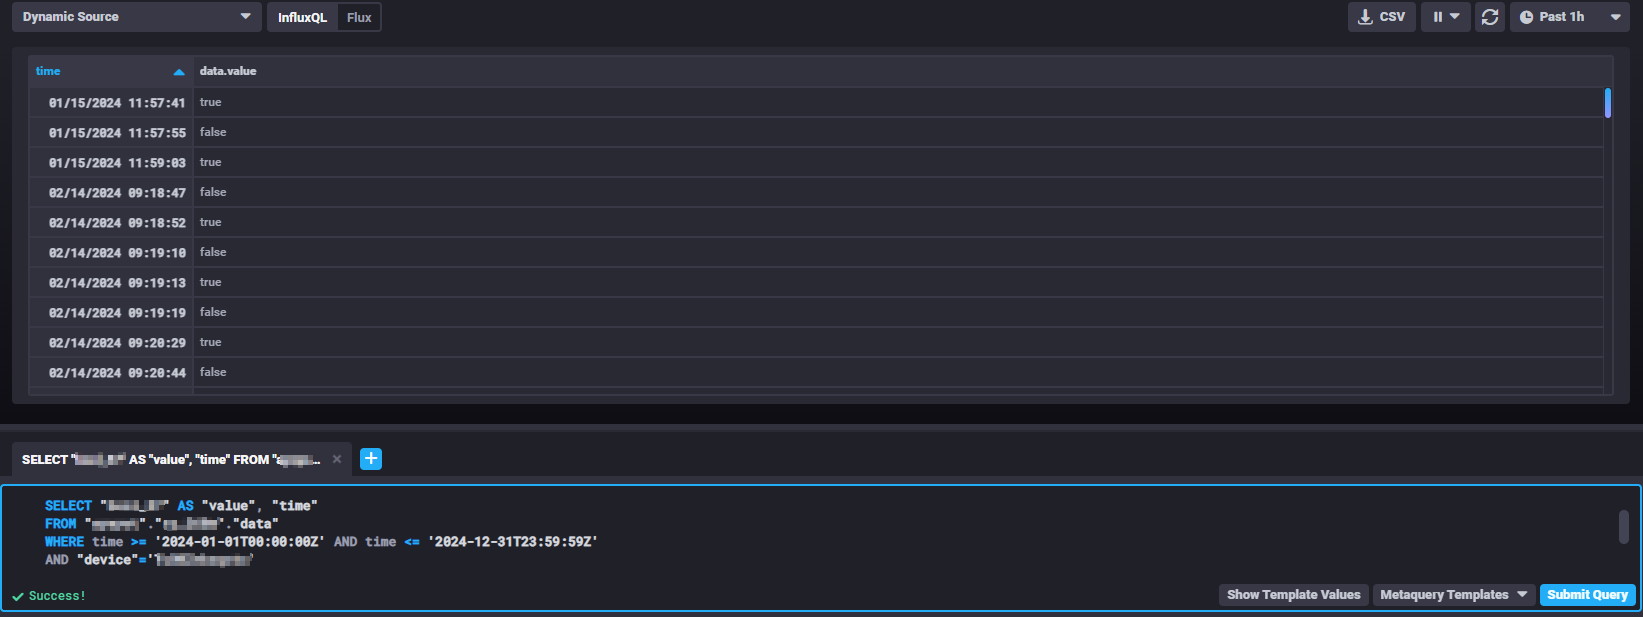
Using Chronograf to run the query
It is possible to run Chronograf on your browser to better visualize the query result. In our example, this is what it looks like in the form of a table:
Optional Steps
The get_data_sources_list function
The get_discovery function will build the request for the AgentDataSourceList API call.
This function is optional in our example since we hard-coded the tag's identifier in the .env file, without having to loop through the list of data sources. We will only need to extract the publicId and name fields:
def get_data_sources_list():
discovery_dict = get_discovery()
url = discovery_dict["AgentDataSourceList"].format(agentId=AGENT_ID)
response = requests.get(
url,
headers={
"Api-Version": API_VERSION,
"Api-Application": API_APPLICATION_ID,
"Authorization": AUTHORIZATION,
"Api-Company": COMPANY_ID,
},
)
if response.status_code != 200:
raise Exception(
f"Failed to fetch Data Sources. Status code: {response.status_code}"
)
data_sources = response.json().get("data", [])
assert len(data_sources) > 0, "No data sources found."
return {
row["publicId"]: row
for row in data_sources if "publicId" in row and "name" in row
}
Data Sources: [{'publicId': '$dataSourceId', 'name': 'Data source'}, {'publicId': '$dataSourceId', 'name': 'Data source'}, {'publicId': '$dataSourceId', 'name': 'MQTT'} ...more data...]
If you want to select a specific data source or more, or if you want to add other conditions, all you need to do at this point is modify the URL and add a filter in the URL and an additional condition with a loop into line 26 of the get_data_tag function, so that you can retrieve a tag for your chosen data source:
def get_data_tag():
data_sources = get_data_sources_list()
chosen_data_source = data_sources.get("$dataSourceName")
discovery_dict = get_discovery()
url = discovery_dict["AgentDataTagList"].format(agentId=AGENT_ID)
url += f'?filters=eq(source.publicId, "{DATA_SOURCE_ID}")'
url += "&fields=tagId,slug,retentionPolicy,variable.type"
response = requests.get(
url,
headers={
"Api-Version": API_VERSION,
"Api-Application": API_APPLICATION_ID,
"Authorization": AUTHORIZATION,
"Api-Company": COMPANY_ID,
},
)
if response.status_code != 200:
raise Exception(
f"Failed to fetch data tags. Status code: {response.status_code}"
)
data = response.json().get("data", [])
for tag in data:
if chosen_data_source["publicId"] == "$dataSourceName" and tag["slug"] == "$tagSlug":
return tag
return None
Tags: {'variable': {'publicId': '$variablePublicId', 'type': 'str'}, 'publicId': '$tagsPublicId', 'tagId': $tagsId, 'slug': '$tagsSlug', 'retentionPolicy': '$retentionPolicy'}
Lastly, the build_query.py function will need some error handling for data_sources. It will look like this:
def build_query(start_time, end_time):
data_sources = get_data_sources_list()
if DATA_SOURCE_ID not in data_sources:
raise ValueError(
f"Data source with publicId {DATA_SOURCE_ID} not found!"
)
tag_id, retention_policy = get_tag_id_and_retention_policy()
query = """
SELECT "{}" AS "value", "time"
FROM "$domain_name"."{}"."data"
WHERE time >= '{}' AND time <= '{}'
AND "device"='{}'
""".format(
tag_id, retention_policy, start_time, end_time, DATA_SOURCE_ID
)
result = query_influxdb(query)
data_points = list(result.get_points())
print("Data Points:", data_points)
return data_points
    SELECT "bool_37" AS "value", "time"
    FROM "ayayot"."rp_260w"."data"
    WHERE time >= '2024-01-01T00:00:00Z' AND time <= '2024-12-31T23:59:59Z'
    AND "device"='TuOBZnkxqxtx'
Updated 29 days ago